
How To Start Facebook Shop page
How To Create Facebook store for Beginners
How many platforms do you currently sell products on? One? Three? Ten? Is one of these a Facebook Shop page? It should be. Therefore, it makes a lot of sense to sell on Facebook:
📢 "You have to learn to sell on Facebook!" All companies, large and small, hear these words without getting much advice on how to do it actually make it successful. In fact, if you have an online store, you should also consider selling on other sites like Amazon, Facebook and even Etsy. This will help you expand your reach and find more customers - as people are more likely to spend time on the other platforms than on your site.
👉 In this guide, we focus specifically on a Facebook store. How to create a Facebook Shop page in one afternoon and go on your journey to sales on Facebook!
We will cover all steps in the process, from blank canvas to a working Facebook store page. But first:
Why and how to sell on Facebook
In a world filled with companies with multiple platforms, it is difficult to keep up with the competition if you do not expand to where your customers hang out the most. And it just so happens that Facebook is one of the places online where people spend most of their time. This is the only reason selling on Facebook is such a great idea!
In fact, Facebook users spend an average of 40+ minutes a day on the popular social network. And a good chunk of that time goes towards Facebook shopping.
It's a lot of time considering that this happens daily! Not to mention, many of us may think about our personal experiences of spending too much time clicking on links and liking posts on Facebook throughout the workday.
Therefore, it's time to take advantage of Facebook as a sales platform! Facebook may not give you as many e-commerce features as, say, Shopify or BigCommerce , but you get everything that is really important for you to start selling your products.
The great thing about a Facebook Shop page is that you do not even need to have any pre-existing online store and can run your entire operation via Facebook if you want. But the benefits do not end there. With a Facebook Shop page you can:
- add an unlimited number of products,
- organize your products into collections and categories,
- communicate with your customers directly via the site,
- see statistics about your sales, visits and more,
- get your products displayed on the Facebook Marketplace, giving you access to a much larger base of potential customers.
The last of this list is a good enough reason to explore the entire Facebook Shop page on your own!
How do I create a Facebook store with Facebook?
Follow these steps to create a Facebook store:
Step 1: Go to your Facebook page and configure the store page.
Step 2: Set your store details.
Step 3: Configure your payments.
Step 4: Add products to your Facebook store.
Step 5: Manage your orders.
Step 6: You're done!
Okay, with all the "why" out of the way, here's how to set up your Facebook store page:
What do you need to build a Facebook Shop page?
💡 If you are not already aware, let me assure you that anyone can create a Facebook Shop page and start selling on Facebook to their followers basically.
Here's what you need before you can get started:
- A Facebook account
- A Facebook company page
Getting the two crossed list should not be too difficult. You probably already have a company page on Facebook so we skip this part and instead come down to the meat and potatoes:
Apart from the two requirements above, your Facebook page must also follow the following:
- Sell physical items - this means there is no way to sell digital or downloadable products from your Facebook Shop page
- Agrees with Facebook 's Terms of Trade
- Link to a valid bank account *
- Have a tax identification number *
* This only applies to US-based stores. The exact tax return number varies depending on where your business is based.
If you are sure that the above will not be a problem in your case, you can continue to set up your Facebook store:
In a hurry? Watch this video on how to create a Facebook Shop page instead of reading

Step 1: Go to your Facebook page and configure the store page
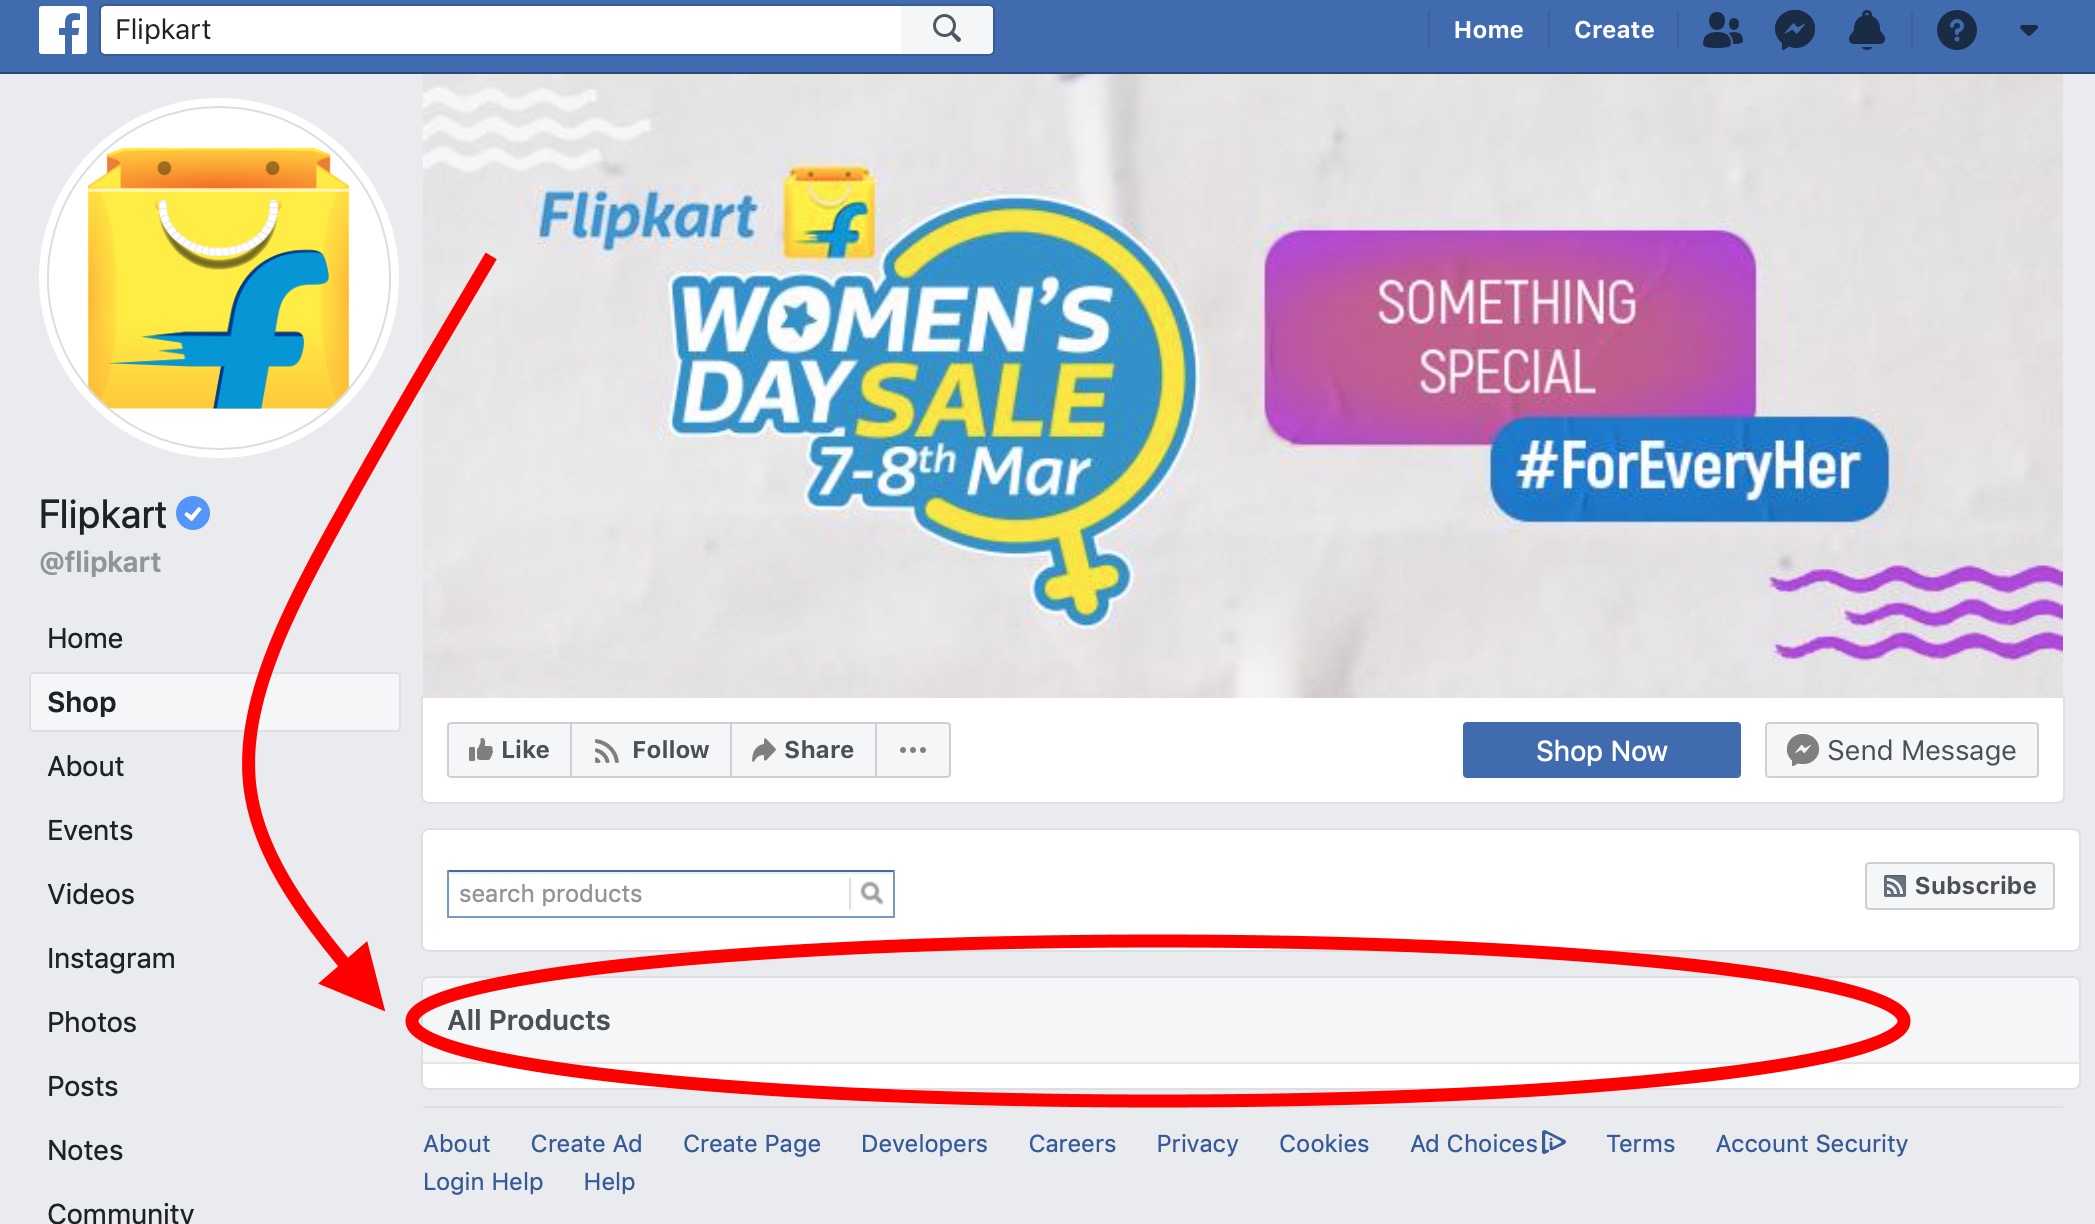
The first step is to navigate to your Facebook company's page. You must be logged in to the company page and have administrator privileges.
By default, many Facebook business pages already have the store page displayed when you are logged in. Your customers do not see it, but you do.
To get started, locate the Shop tab on the left and click on it.
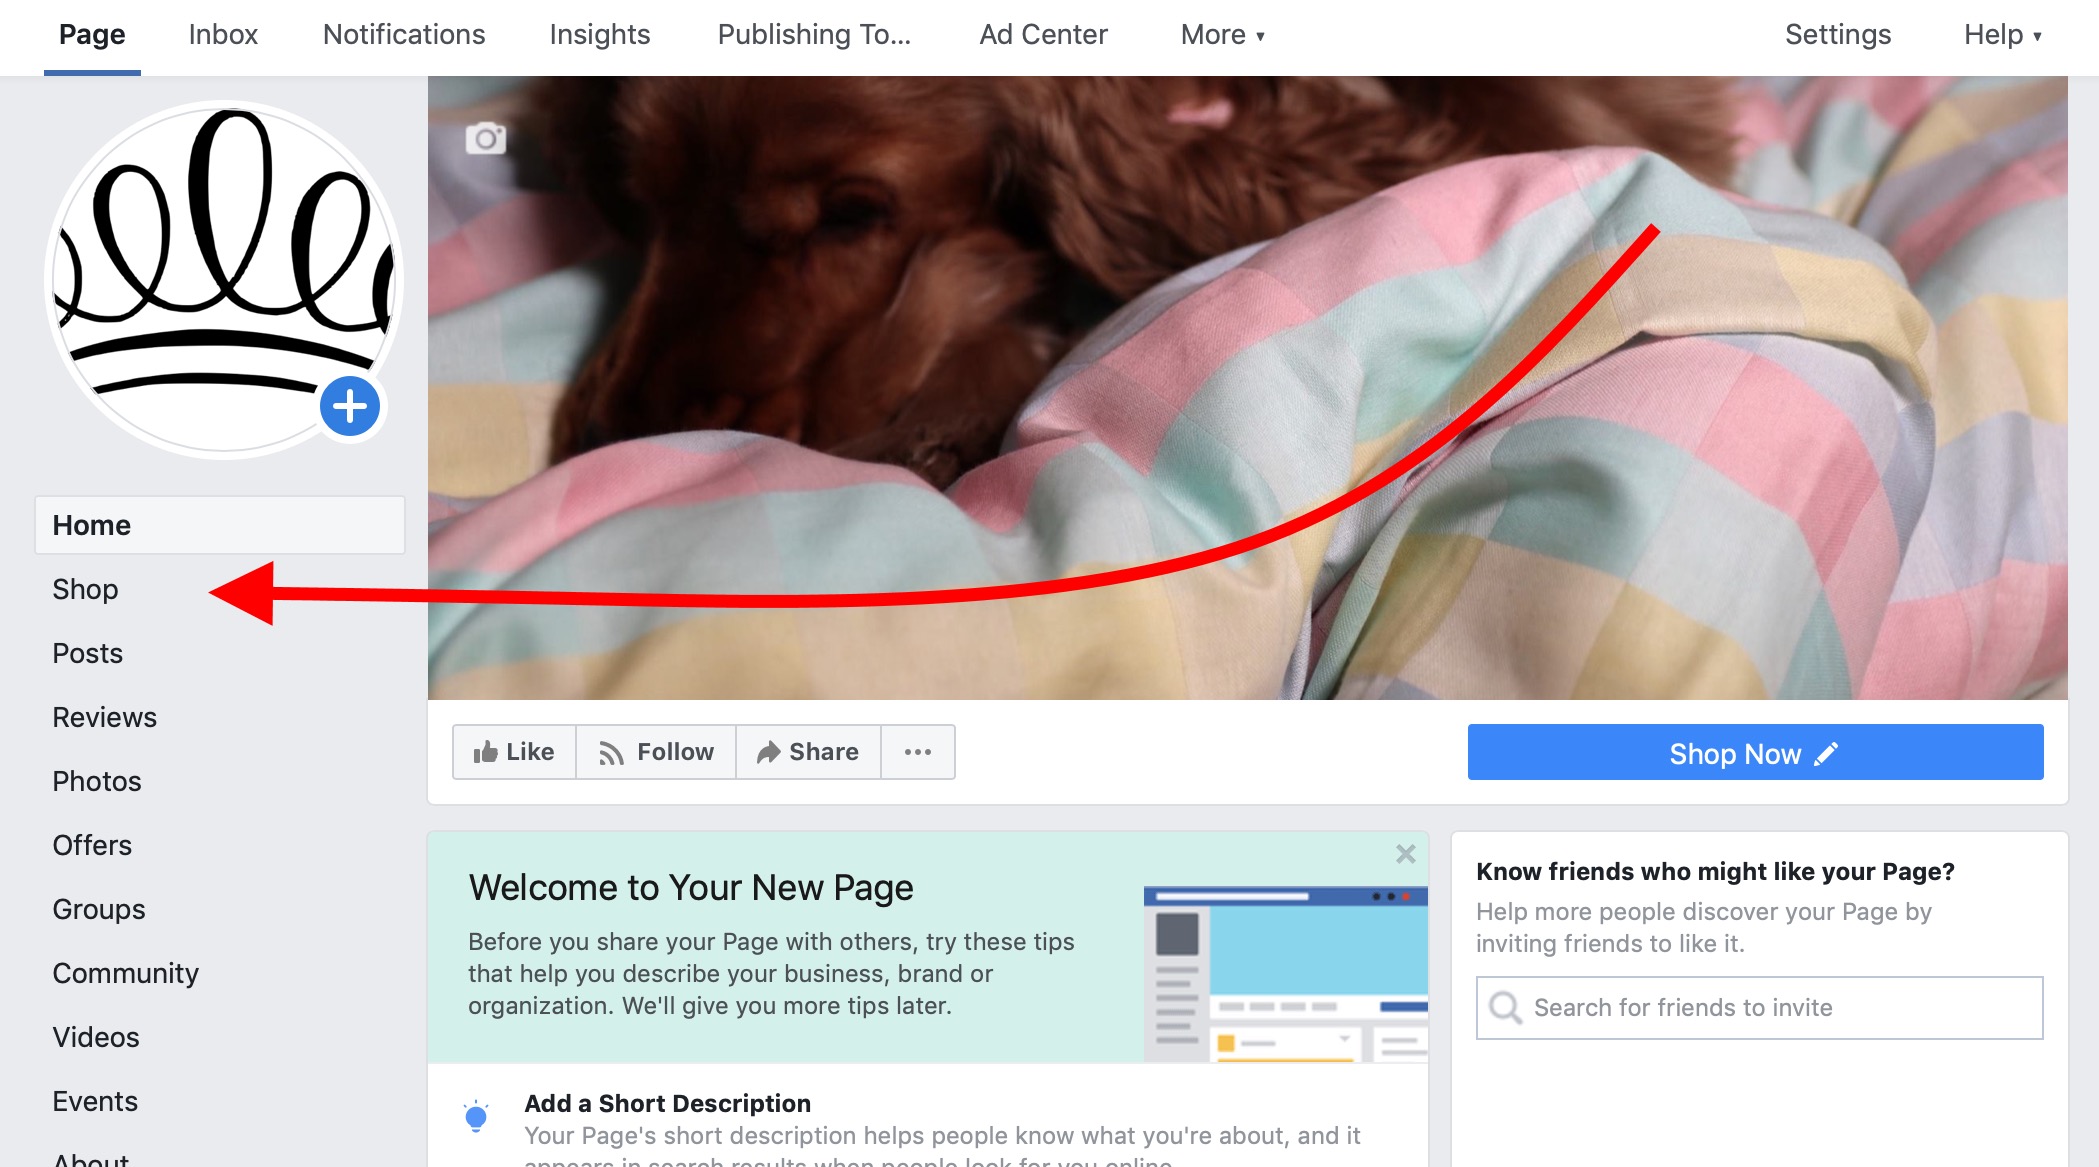
Having trouble finding the Store tab?
If you do not see the tab, it means that you do not have the correct page template enabled. To create a Facebook store, you need a template called "Shopping".
To change your template, go to Settings → Templates and tabs .
Find the Current Template area and click the Edit button.
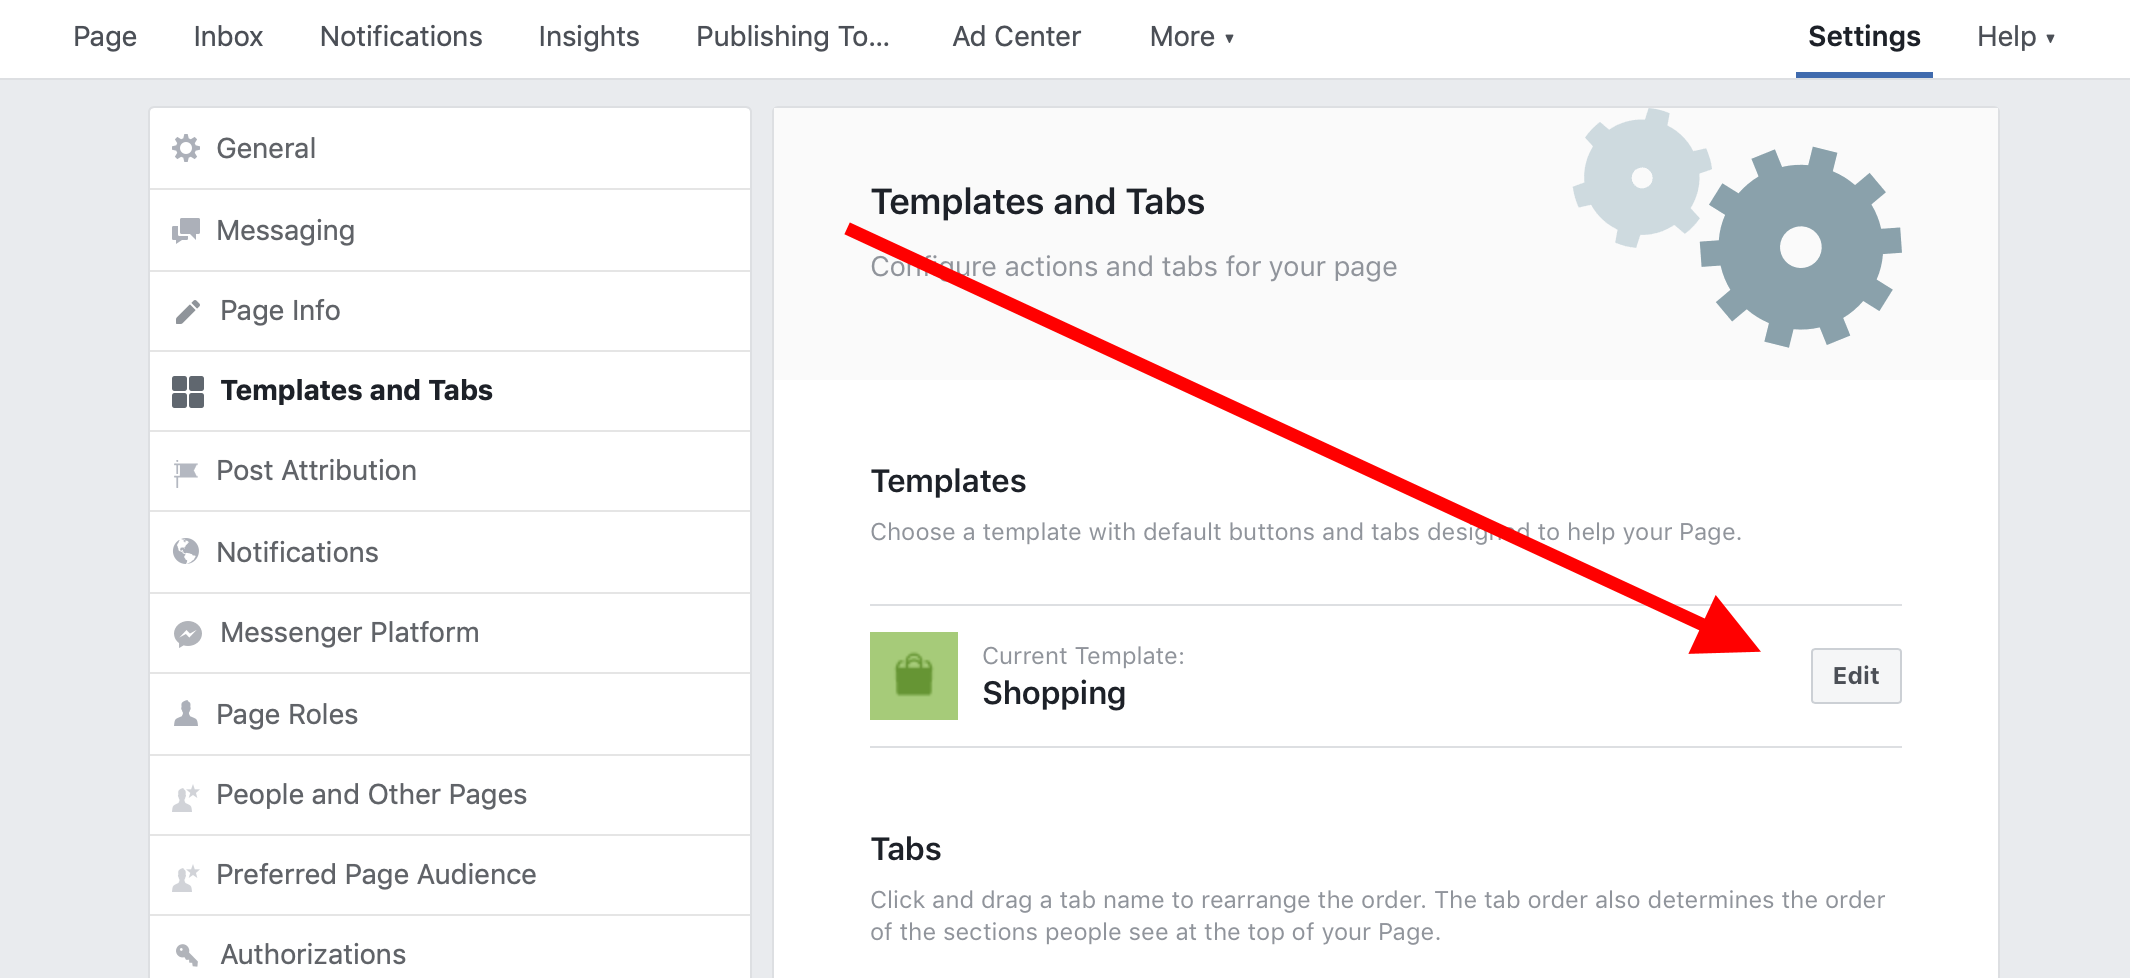
From there, you can apply Shopping template. Some of the others have the Shop tab as well, but the Shopping template should work well for most stores.
Once you've got it Shop on your page, click on it.
Step 2: Set your store details
Read this for US-based stores 🇺🇸
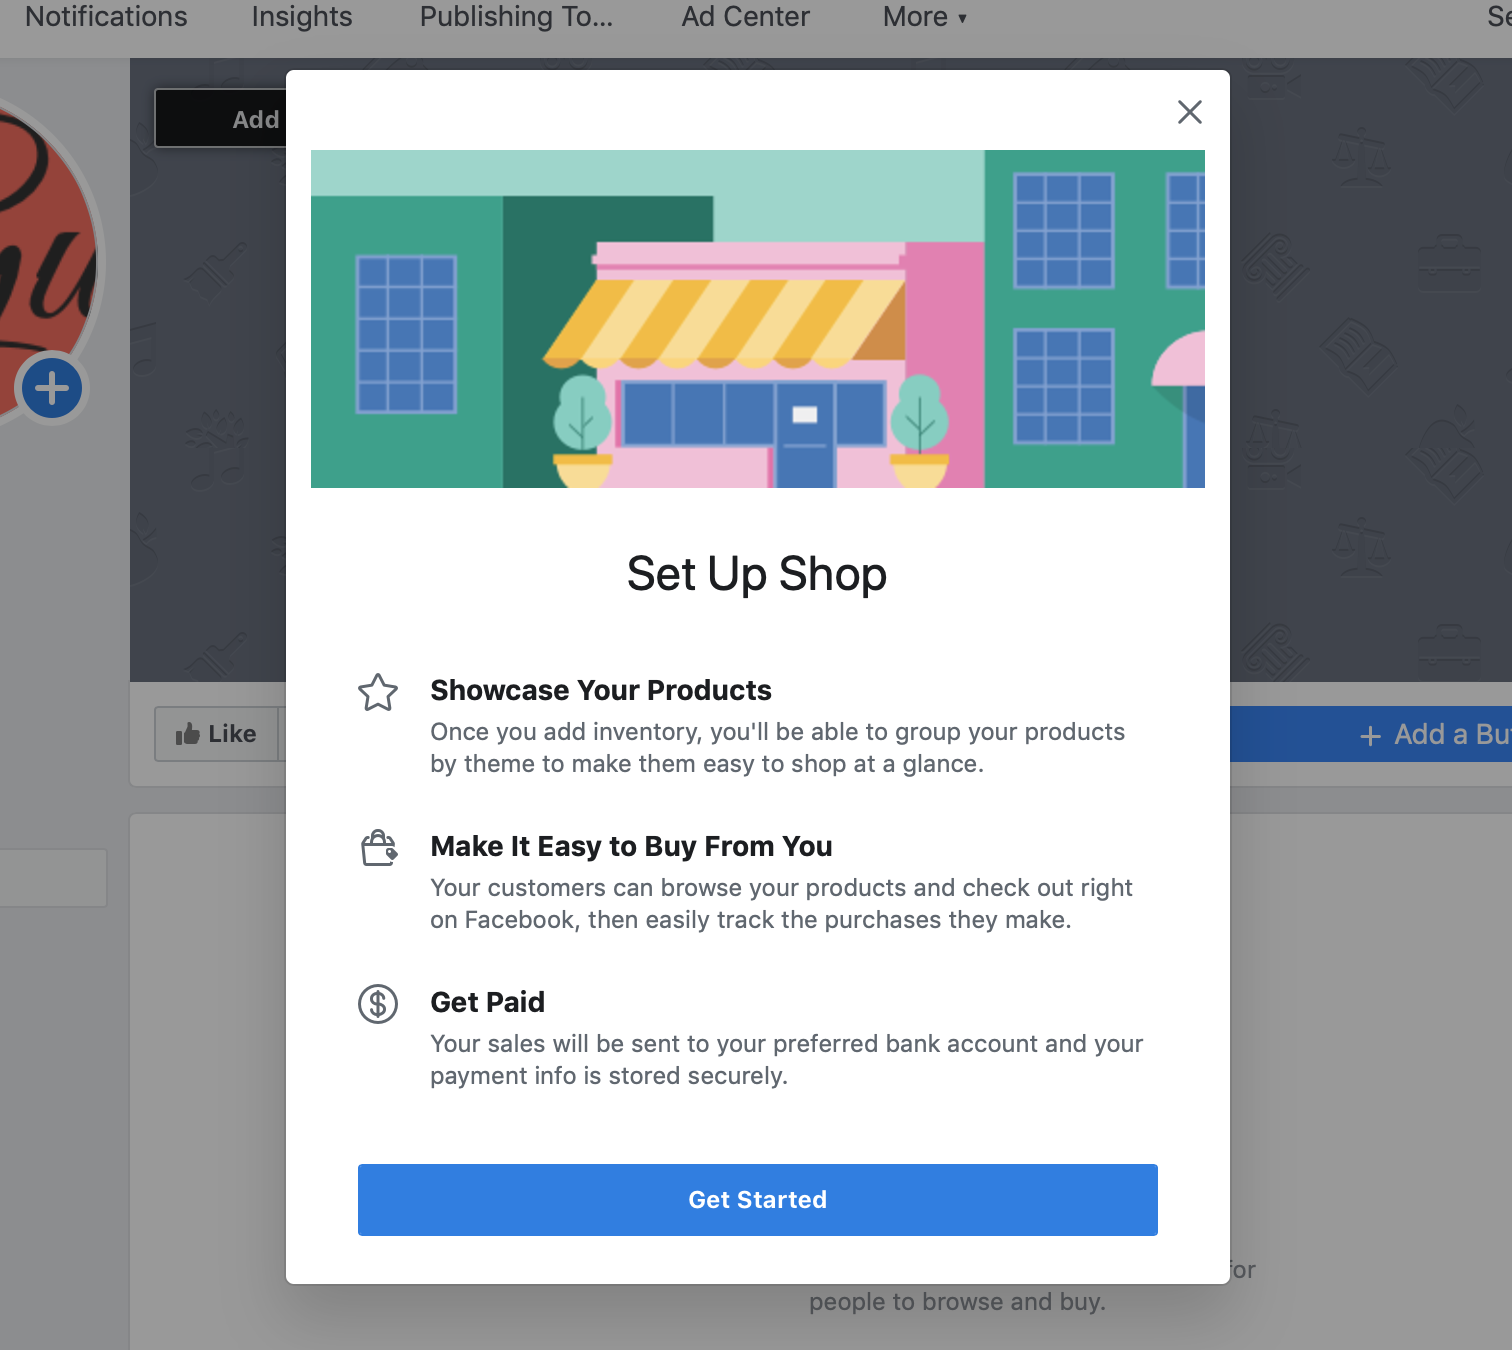
Selecting the Shopping tab displays a popup explaining the installation you are going to go through. Feel free to read it and then click the Get Started button.
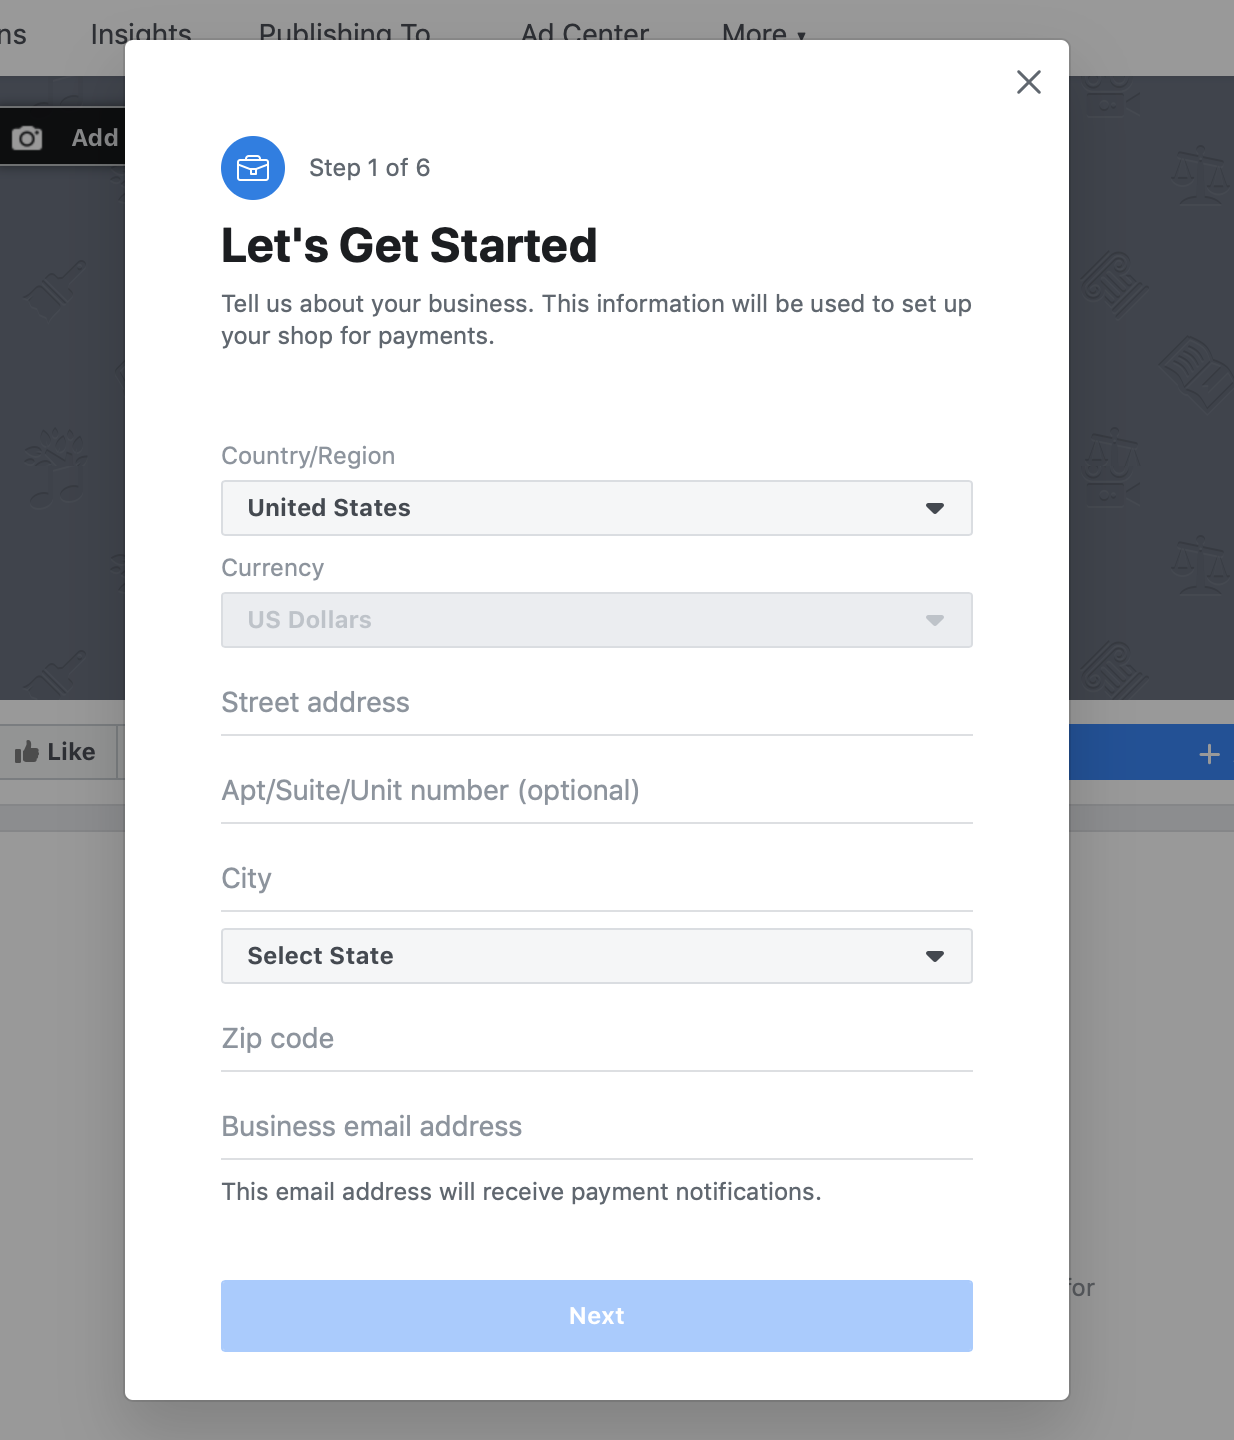
Another pop-up will ask about your business details. Start by punching in your business type and address. Then click Next .
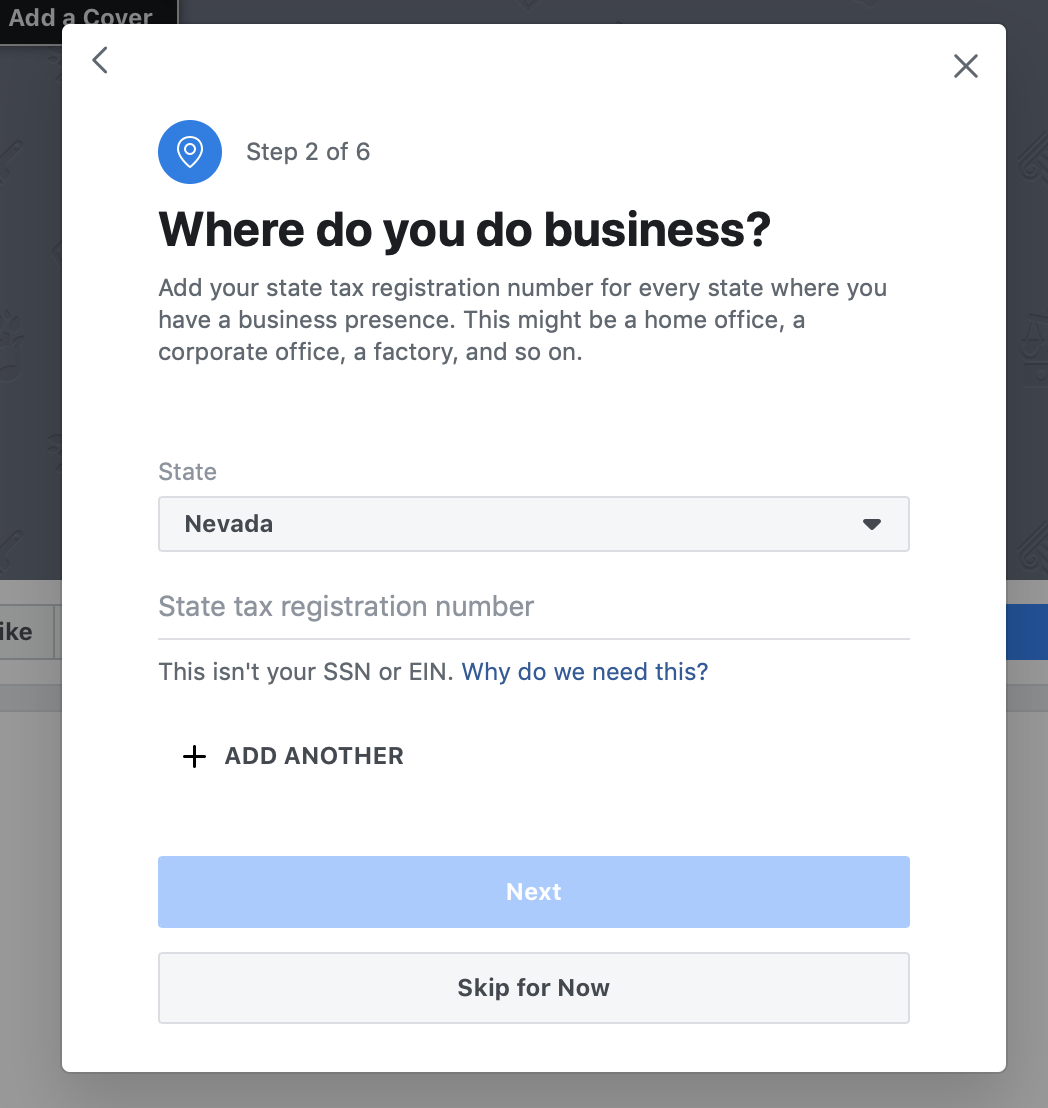
The next step is to ask for the states where you shop and your tax registration number. You can skip this step for now, but at some point you will need to provide Facebook with this information.
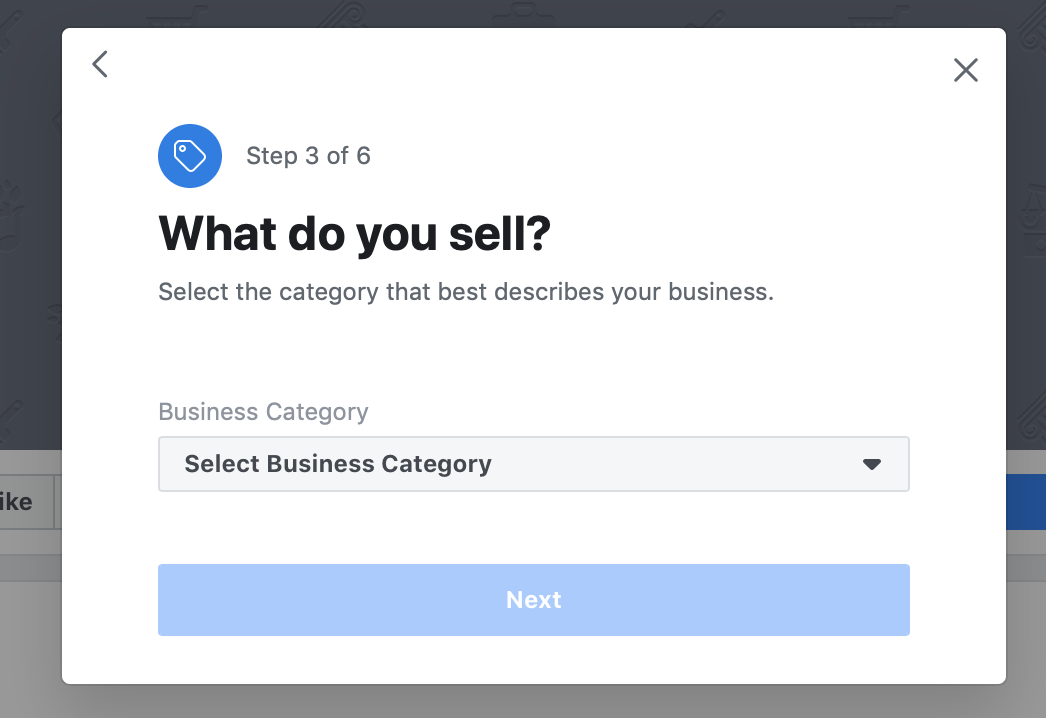
The next step is where you can specify the type of products you intend to sell on Facebook.
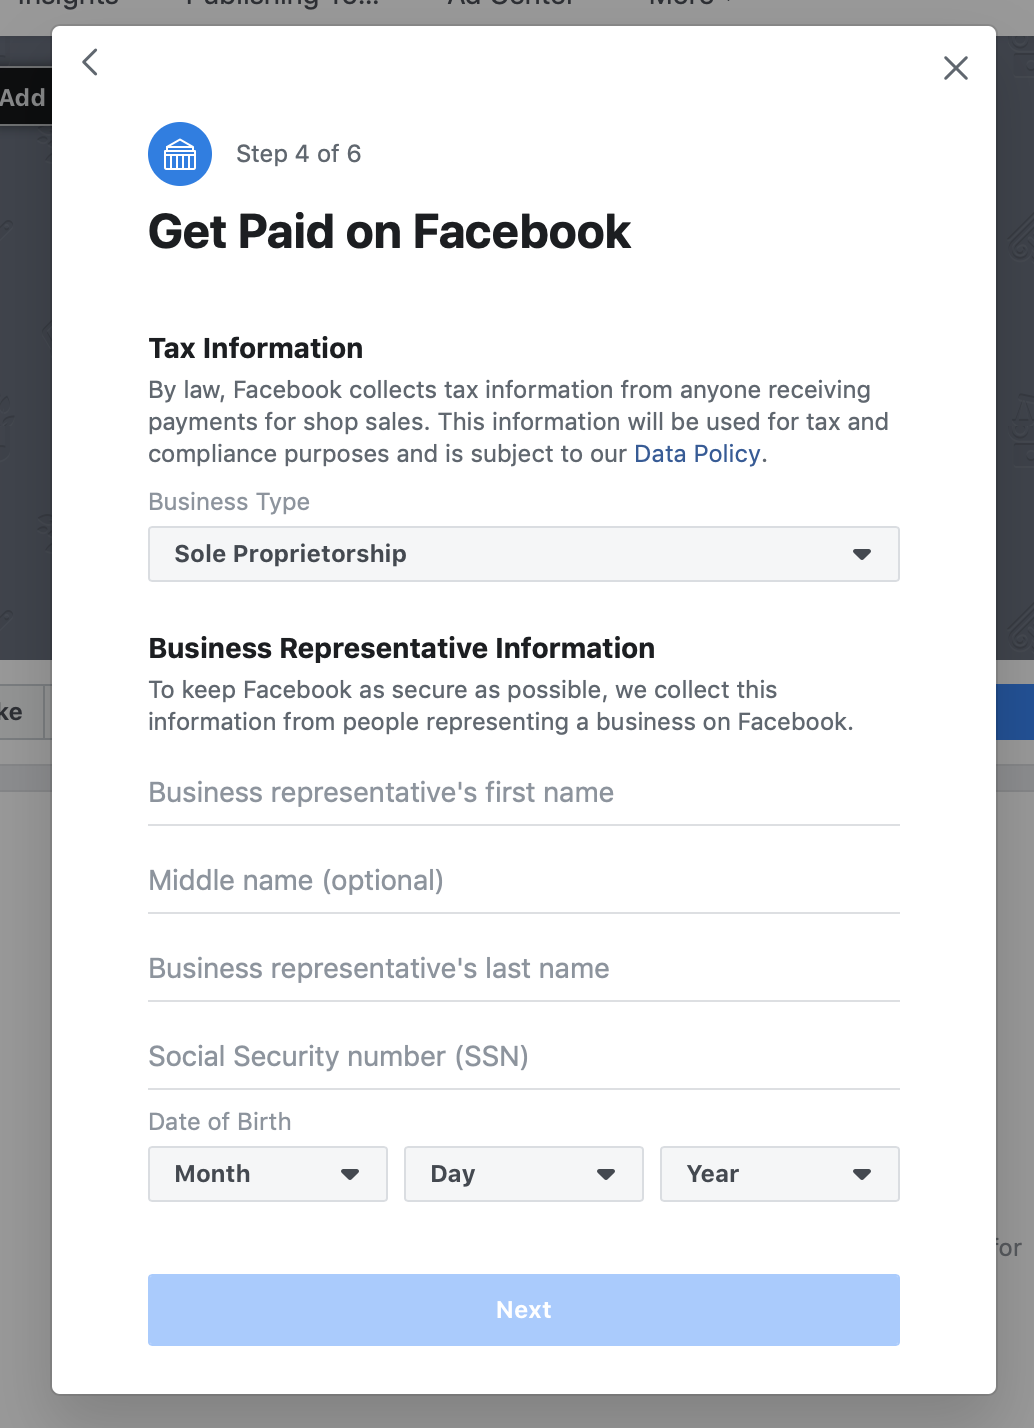
We are not done with taxes yet! In the next step, Facebook asks about the type of your company and information about your company representative - this will probably be your own information, unless you want to appoint someone else.
With that done, you have the difficult things behind you, and you can now complete the installation of your store on Facebook.
The last things to clarify are your delivery options, return policy and email with customer service. Just select from the list of available delivery options and enter your details for each.
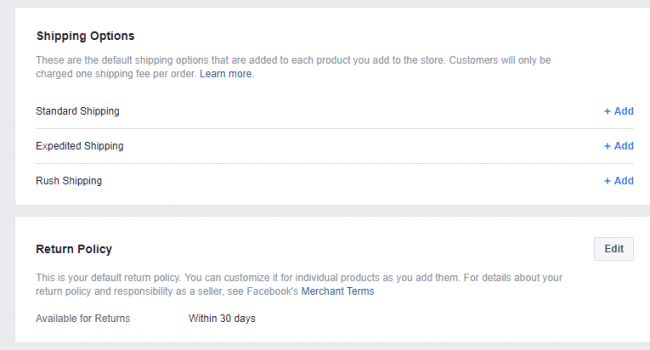
According to Facebook's rules, you must send the package within three working days after receiving the order. The customer must receive the package no more than ten days after they order - this is one of the factors that makes Facebook shopping attractive to people. You must also use shipping services that offer features such as tracking and delivery confirmation. An important detail is that the customer can cancel their order within 30 minutes after the purchase if you have not marked it as delivered yet.
In addition, Facebook does not allow you to ship internationally or sell to countries other than your own - the country in which the store was set up. In most cases, if a person from another country enters your store page, they will see a blank page, which This:
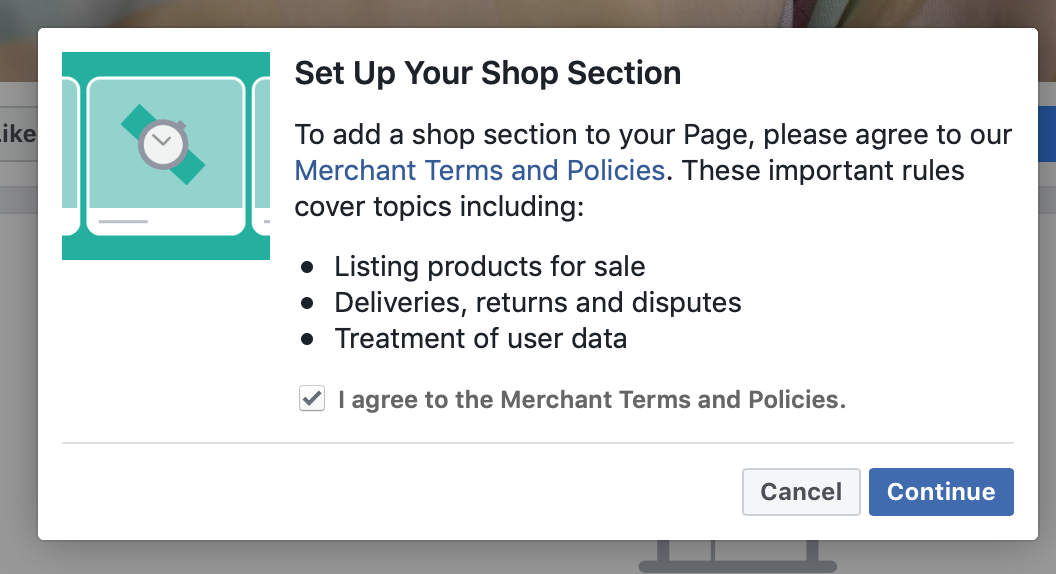
One last step before completing the installation that you may need to go through is to accept the terms of trade and policies (depending on your account settings and location).
Read this for stores that are not based in the US ⛔🇺🇸
Clicking on the Shop tab from the sidebar first shows a box for terms and conditions. To continue, check the box next to "I accept the seller's terms and policies" and click Continue .
Next, you need to choose the actual method by which the orders are to be handled.
⚠️ Important; Depending on your country, you may not even see the following panel, but will be redirected directly to the screen to create the store page instead.
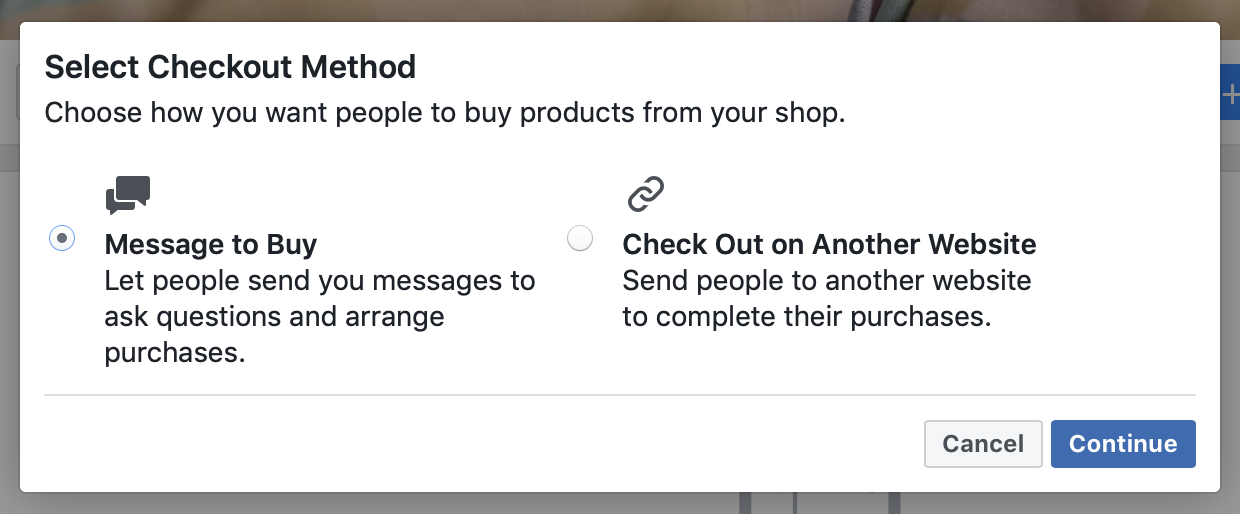
- (A) Message to buy is the easiest way to handle orders. In this model, as the label says, you get a message (inside Facebook Messenger) when someone wants to buy a product, and then it's up to you to communicate with the customer, agree on all the details and ultimately make their Facebook shopping experience is positive.
- (B) Checking out another website is without a doubt a more user-friendly approach where everything is taken care of by an external e-commerce set / store.
So, which one to choose?
The advantage of option (a) is that you do not need to have an online store at all to be able to receive orders via Facebook. Literally every step of the process can be handled via Facebook Messenger where you and the customer agree on how to handle the order, the payment method and so on.
The downside is that it is a lot of manual work to handle all messages and it is easier to overlook a new order that arrives. In addition, you do not get the benefit of having most of the technical heavy lifting handled by an e-commerce tool like Shopify.
The advantage of option (b) is that you can let the customer choose the product they want on Facebook and then redirect directly to your shopping cart software to complete the purchase (granted, this is not 100% Facebook shopping, but more about driving people to your external online store).
The obvious downside is that you have to own an e-shop. Fortunately, getting one is not that difficult. We cover the topic in this guide .
The short answer is this:
- If you already have an online store running Shopify, BigCommerce, WooCommerce or any other e-commerce platform, then select option (b).
- If you do not have an e-commerce store set up and you do not want to do it now, go to option (a).
In this demonstration, I select (b).
Obs; if you go with option (a) - "message to order" - your attitude will be mostly the same, with only minor differences, so feel free to follow this guide as well.
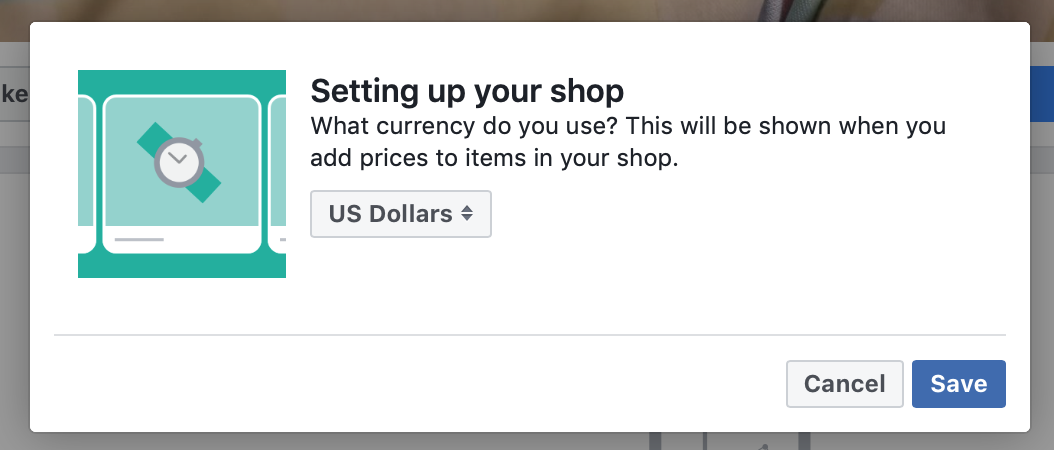
The next step is to choose your currency. Nothing too difficult here:
With that done, you will come to your new Shop page where you can add your products and set everything up.
Step 3: Configure your payments
Depending on your country where the business is located, the module in the Facebook store will present a different set of options here. For US-based companies, the most common installation involves linking a bank account and getting the money (from your orders) deposited there.
In other cases - for other places internationally - Facebook can let you set up payments via PayPal or Stripe.
The integration process itself is simple, but it changes from time to time due to the updates with PayPal and Stripe themselves.
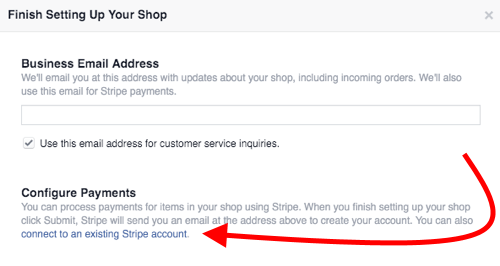
The good news is that you will be taken by hand by the Facebook store interface along the way through the installation.
⚠️ "I do not watch this episode!"
Yes, in some cases you may not see this section of the installation at all - this is what happens, for example, if you are an EU-based user. In that case, you can proceed to the next step click here .
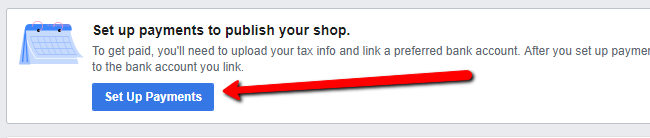
👉 The following are bank accounts for users in the United States. ????????
At this point, you should see a module that asks you to set up your payments to publish your store. Click the Cancel Payments button to continue.
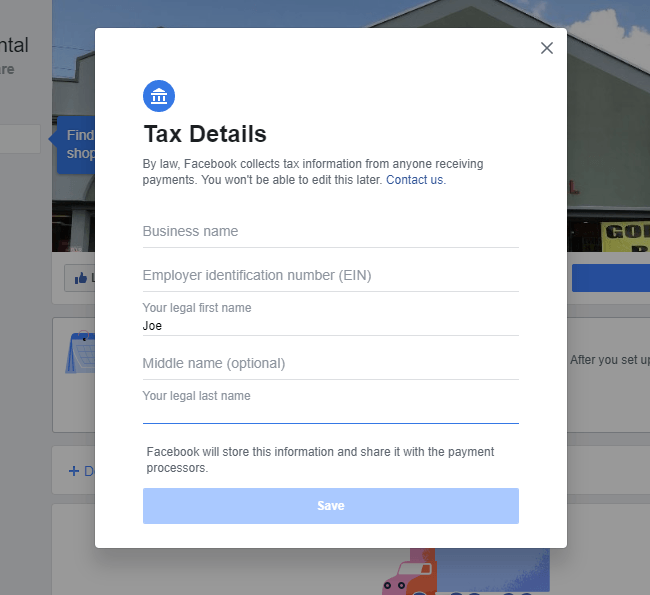
The first pop-up window asks for your tax details. This is required and can not be edited later. So make sure you have the correct information about your company name, employer identification number and your legal name. Click the Save button.
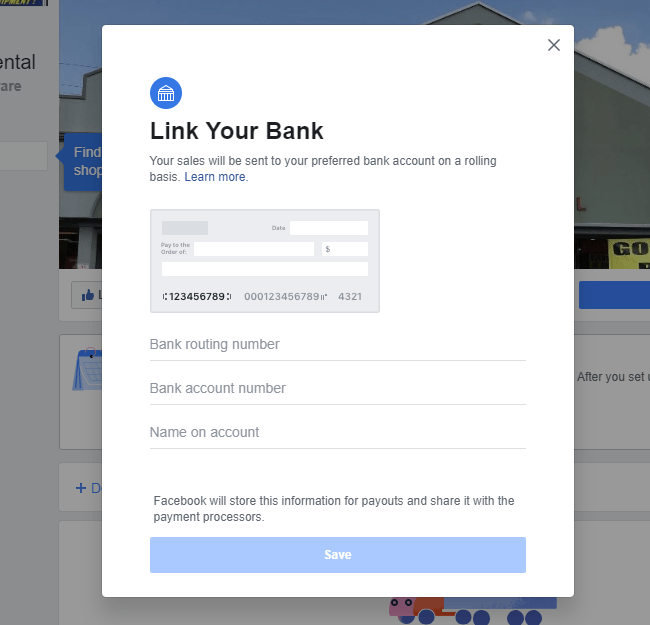
The last step is to link your bank for payment. Enter your bankruptcy and account number, along with the name of the account. Click the Save button.
Step 4: Add a product to your Facebook store
This is what your new store page looks like when you first create it:
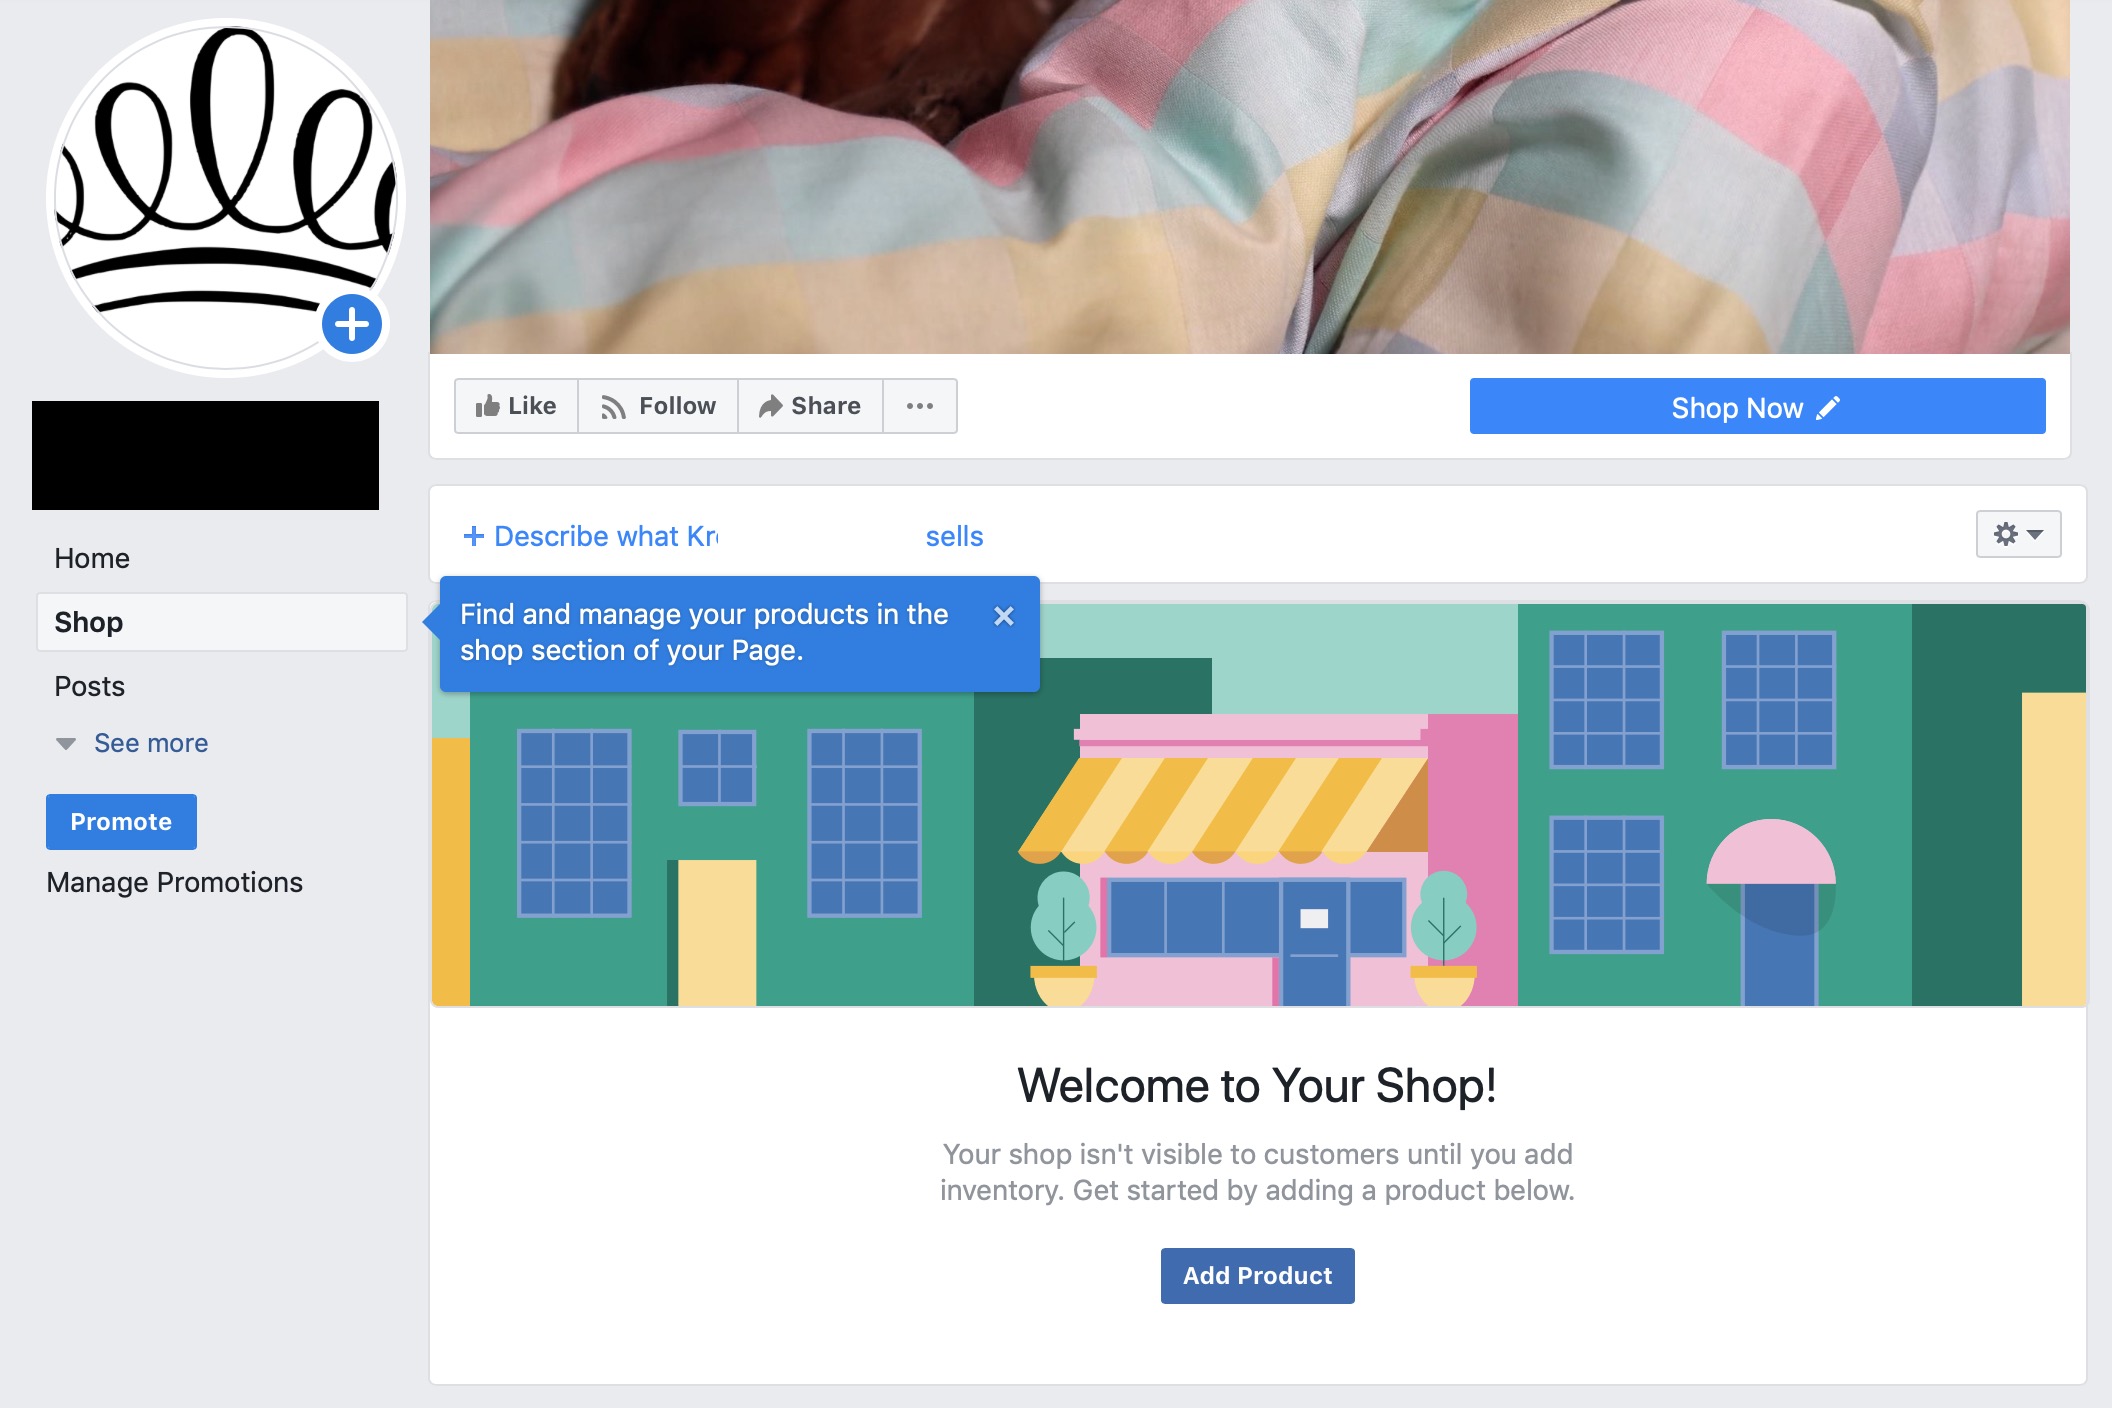
As you can see, Facebook encourages you to add your first product. You can do this by clicking the Add Product button. When you do, you will see the following form, but it will vary depending on your country:
For US stores 🇺🇸
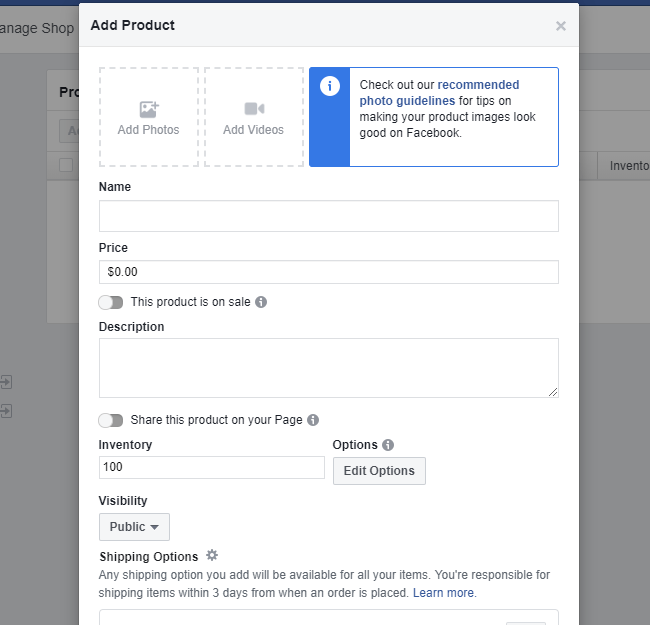
The shape looks quite simple and has all the details you can expect.
- Product photos or videos. Adding at least one image of your product is a must. It is much better to add more pictures. If it's relevant considering the type of products you sell on Facebook, you can also add a video. Click Add Photos to insert product images. This works just like any other upload interface where you can take a picture from your computer and upload it to the Facebook store.
- Name and Description are pretty self explanatory. Again, it all depends on the type of products you sell, so feel free to get creative and talk about what makes the product special. You can also easily copy the product description you use in your e-commerce.
- Price . No product list can live without this crucial detail.
- Stock . By tracking your inventory, you help yourself capture the amount of sales you have and make sure everything is in the book.
- Shipping options . Choose from the set of delivery options that you have configured during installation and fill in the details for this specific product.
- Share this product on your page . You may want to check this box to share the product on your page as soon as you approve it.
- Sight . Set this to "Public".
Click Save to complete the process.
For international stores ⛔🇺🇸
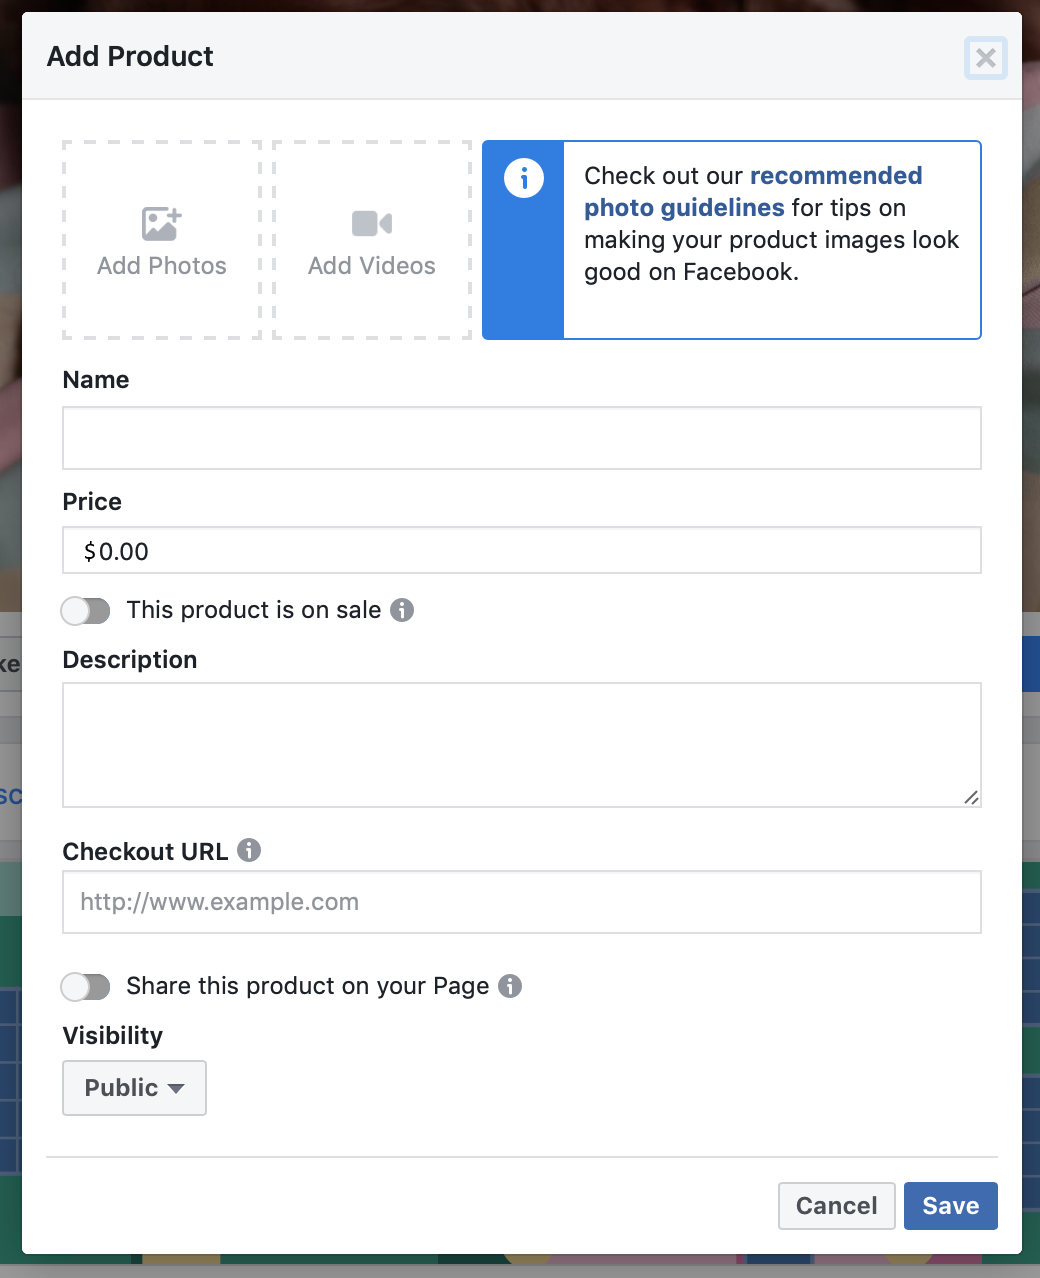
The form contains all the necessary details required to describe your product in its entirety.
- Product photos or videos. Adding at least one image of your product is a must. It is much better to add more pictures. If it's relevant considering the type of products you sell on Facebook, you can also add a video. Click Add Photos to insert product images. This works just like any other upload interface where you can take a picture from your computer and upload it to the Facebook store.
- Name and Description are pretty self explanatory. Again, it all depends on the type of products you sell, so feel free to get creative and talk about what makes the product special. You can also easily copy the product description you use in your e-commerce.
- Price . No product list can live without this crucial detail.
- Checkout URL . (You will only see this field if you choose to "check out another site" during the initial setup of your store page.) This is the specific URL of your e-commerce store where this product can be purchased. Whether you use Shopify, WooCommerce or something else, you can get your product link by simply navigating to the product via your browser and then copying the URL from the address bar. Paste the URL in the Checkout URL field.
- Share this product on your page . You may want to check this box to share the product on your page as soon as you approve it.
- Sight . Set this to "Public".
Click Save to complete the process.
When done, you will see your product live on your store page.
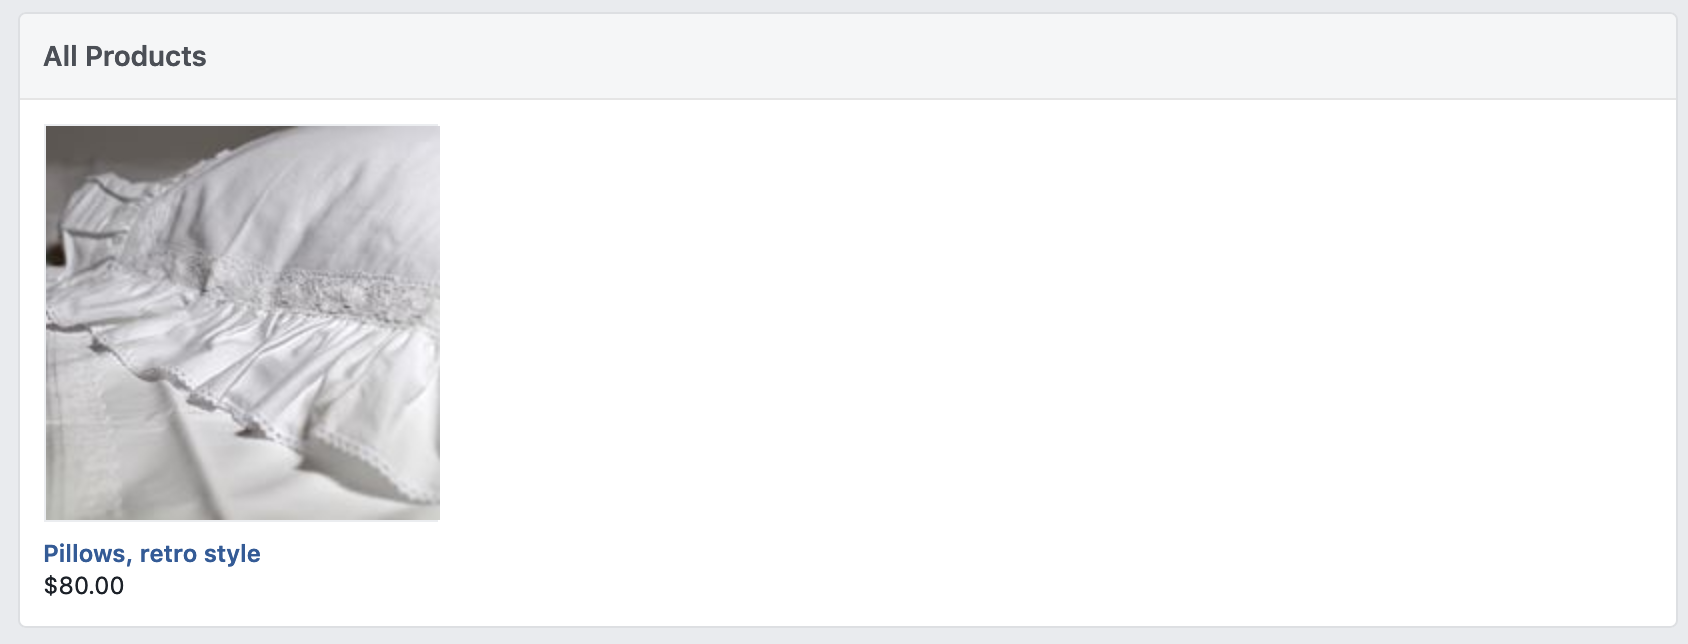
When a customer clicks on it, they see a more detailed view, along with a button that lets them "Check out the site" - this leads them to the product page of your e-commerce store.
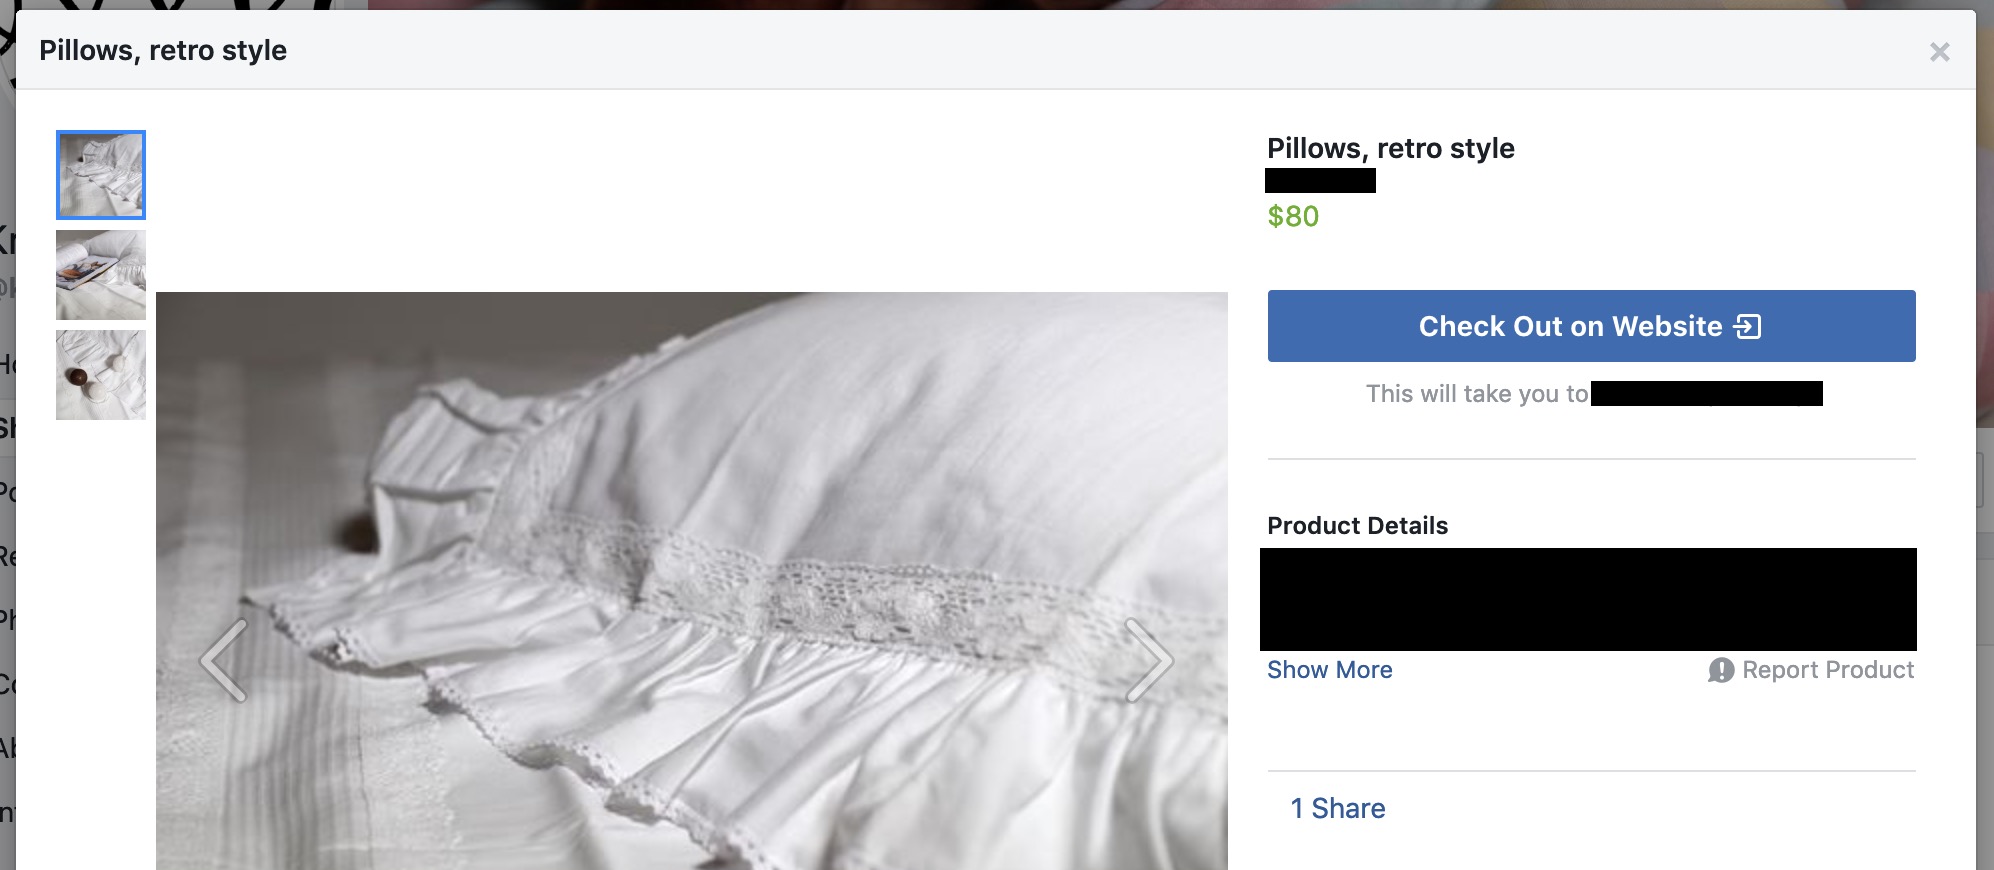
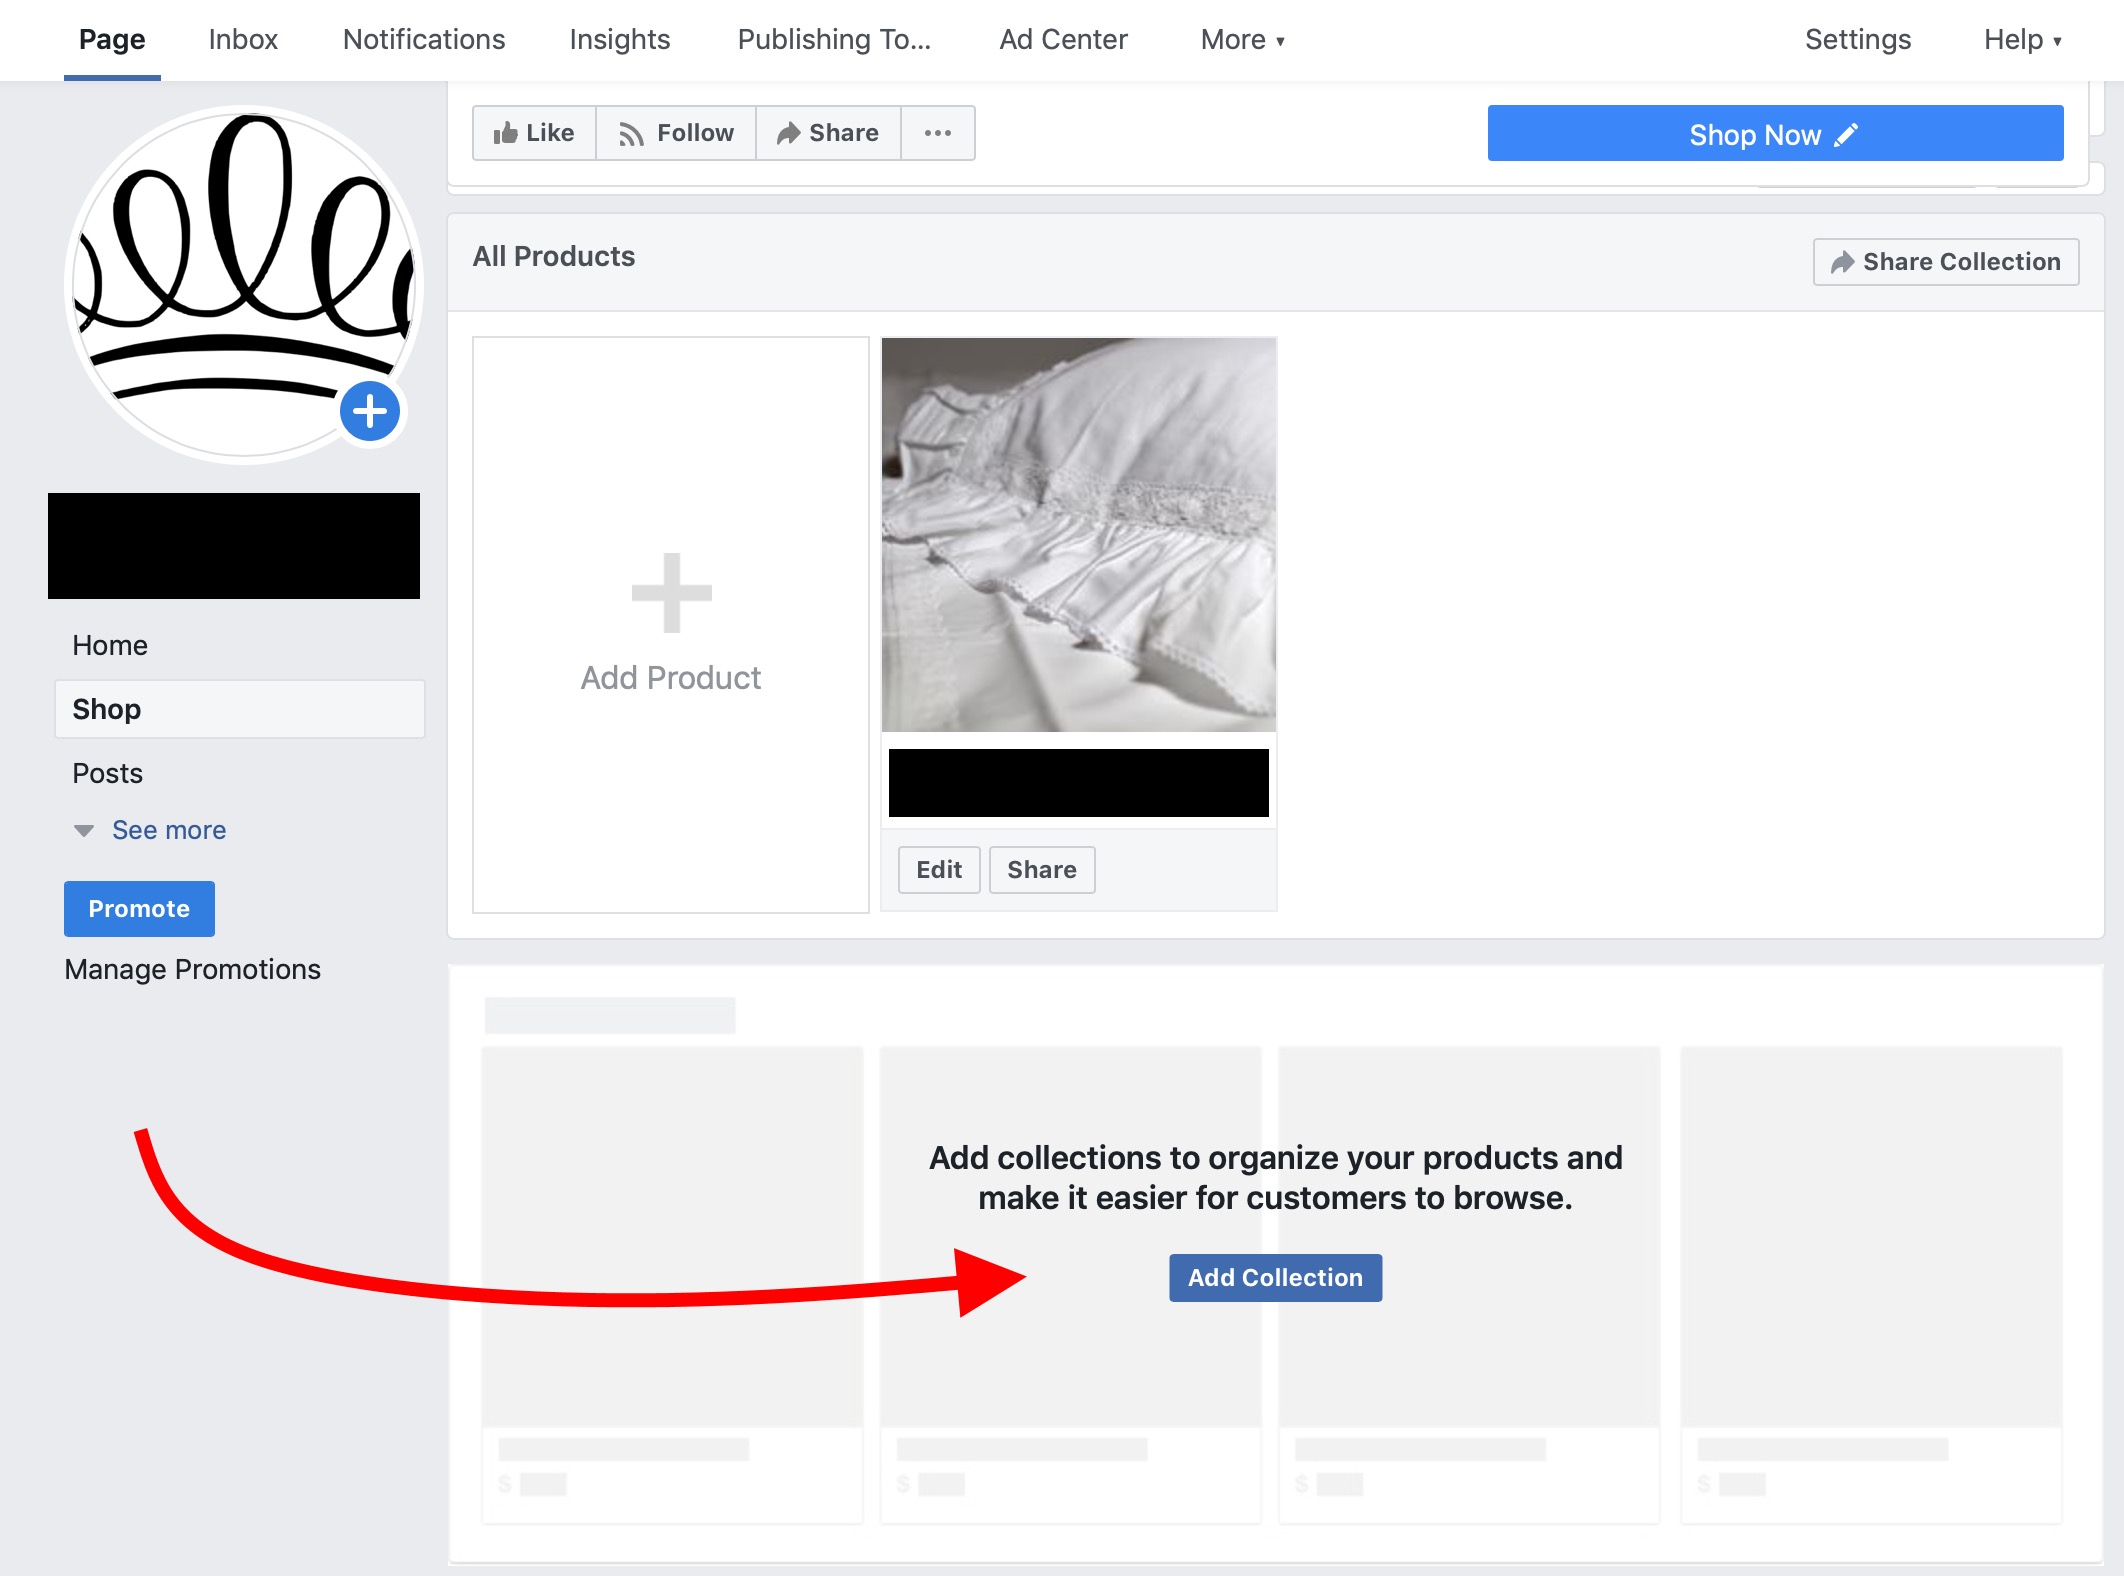
You can add more products to your store at any time via the Add Product button.

Or if it makes sense in your case, you can also create product collections.
Manage your products
Once you have uploaded a certain number of products, you will see each of them placed on a list in your store management panel. To get to it, just click on the Publishing Tools link in the top bar:

Once there, from the sidebar, click Products . You will see a screen like this:
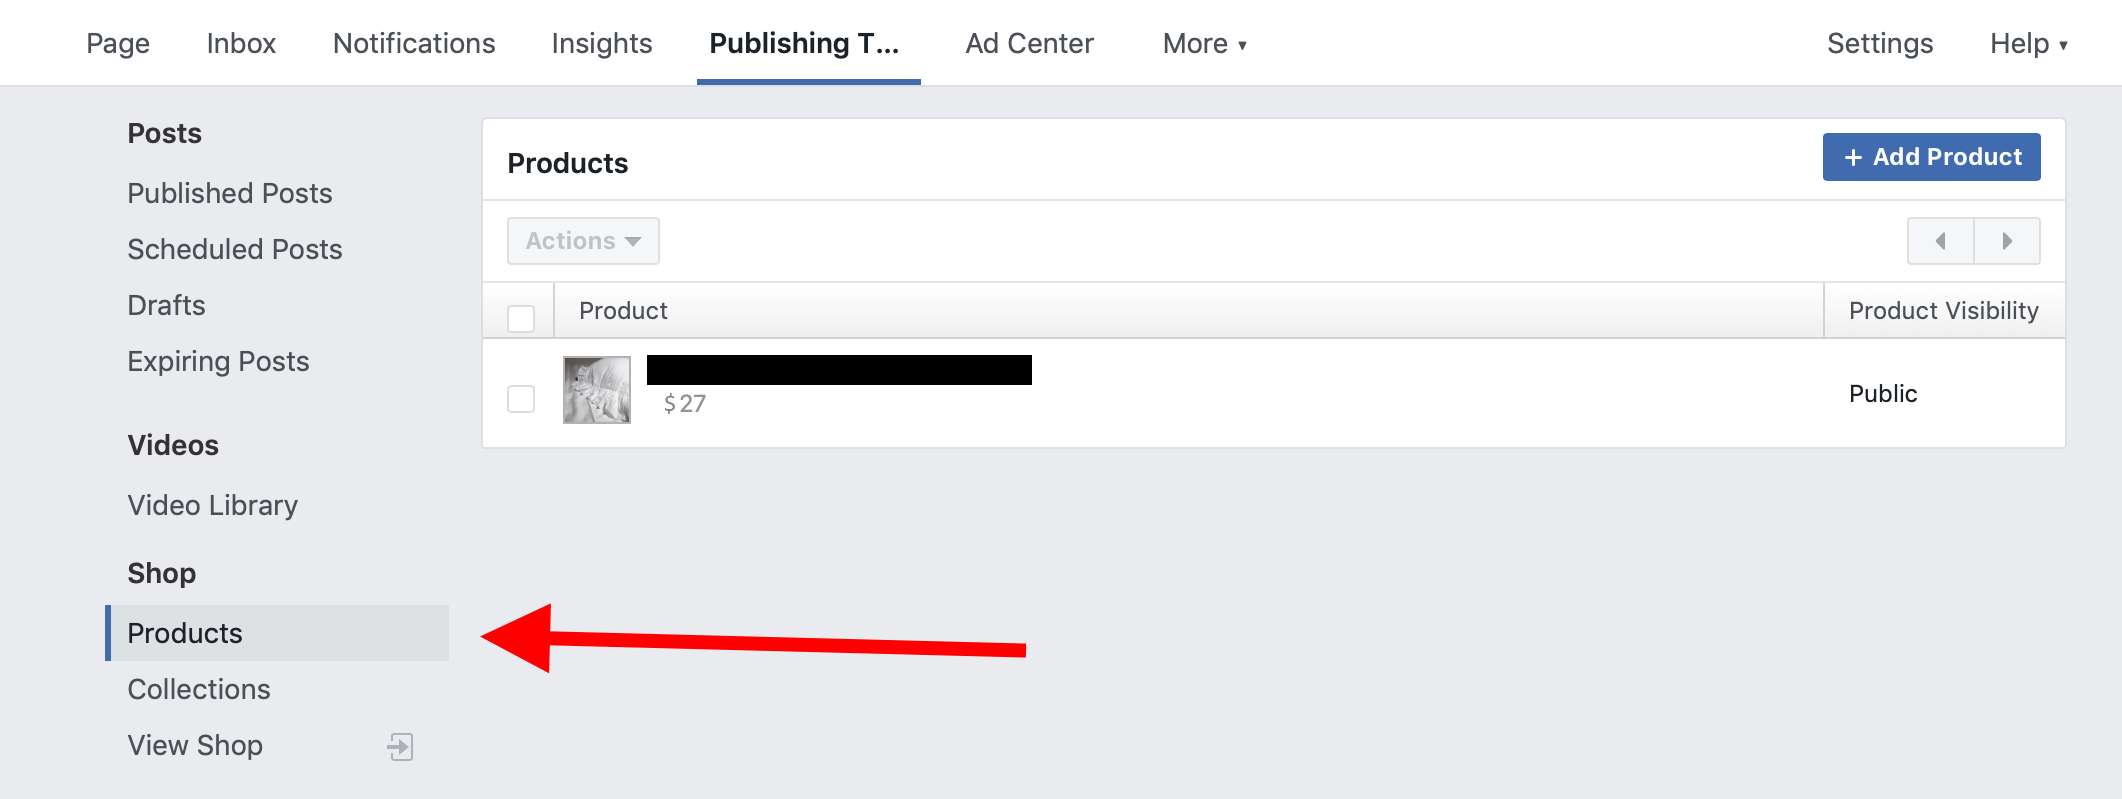
From here you can edit each of your products and add new ones.
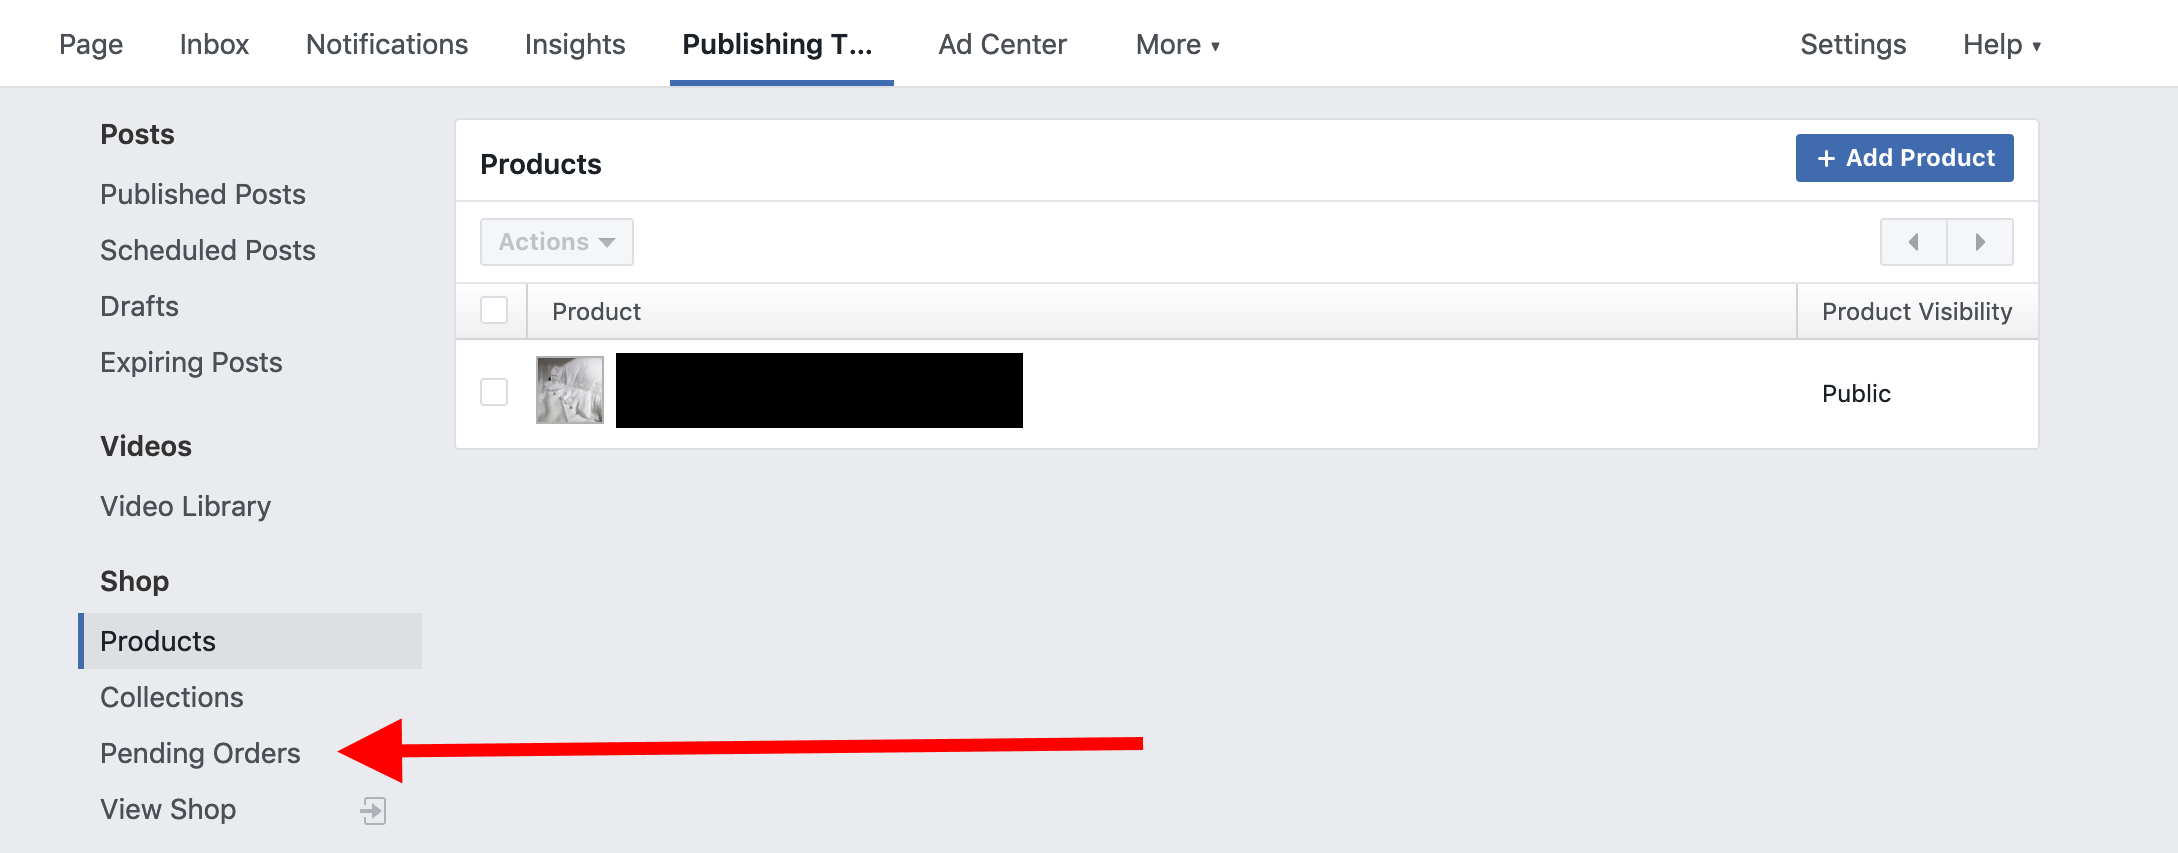
Step 5: Manage your orders
⚠️ Order management is not a feature that is rolled out for Facebook stores worldwide. It is found mostly in the United States and a few other places.
How to find out if you have this feature?
Easy, go to your Publishing Tool from the main menu:
Look for ongoing orders link in the sidebar. If it's there, you have order management!
When you click on that link, you can take care of your orders, check the details of each one, see the buyer's information, communicate with them and eventually complete the order. In addition, Facebook will send a message when an order comes through.
Just to remind you, according to Facebook's rules, you must send each order within three working days of receiving the order. When the order has been sent, click Mark as delivered to complete everything.
Alternative installation: How to sell on Facebook via your existing e-store
The scenarios presented so far in this guide have all been quite "manual" in nature, due to the lack of a better word. What I mean is that it was entirely up to you to set up your Facebook store. But that does not have to be the case.
Some of the modern e-commerce solutions actually have good integration with Facebook and will automatically create a store page for you, while you connect your external e-store and Facebook Shop page.
This means that you can take care of your orders and products in a single place and get everything synchronized with Facebook seamlessly.
We show you two ways to do it - with the most popular e-commerce solutions on the market: Shopify and BigCommerce.
How to sell on Facebook via Shopify
Shopify is a fantastic e-commerce solution by itself. We have talked a lot about this on the website and recommended it to practically everyone who is looking for an easy way to start an online store.
One of ShopifyMany advantages is that it also allows you to establish your store on Facebook without having to deal with much of the technical obstacles.
All you have to do is go to your Shopify panel and add an app called Facebook Channel to your installation.
When you install the app, what happens is that Shopify takes all your products and exports them to your Facebook Shop page. Everything is synchronized so that you can continue to manage your store on Shopify and let all the changes be sucked into your Facebook Shop page.
If that's not good enough, Shopify even gives you tools to sell via Facebook Messenger .
👉 Click here to go to Shopify and get started .
💡 Keep in mind, however, that Shopify does not give you a smart back door in Facebook's interface for setting up the Shop page. The same Facebook rules and restrictions still apply. If, for example, Facebook does not allow handling of orders via the Facebook interface in your country then Shopify does not have the ability to help you with that either. The same goes for other restrictions.
How to sell on Facebook via BigCommerce
BigCommerce is the main competitor to Shopify and - in many ways - a good alternative that offers about the same range of features, only in a different package. Chances are you will find the solution that suits you perfectly with either Shopify or BigCommerce.
On the Facebook Shop page, BigCommerce lets you do about the same thing that Shopify does - which is connect your online store seamlessly and have all your products available on Facebook.
In terms of installation, getting things to run with BigCommerce is very similar to how it is done with Shopify as well - just install an extension on the Facebook store and you're done.
BigCommerce also has a very good module for Facebook ads, which gives you another interesting way to put your products in front of people.
👉 Click here to go to BigCommerce and get started .
💡 Remember that again BigCommerce does not give you a smart back door in Facebook's interface to set up the Shop page. The same regional rules and restrictions of Facebook still apply. If, for example, Facebook does not allow order handling via the Facebook interface in your country then BigCommerce does not have the ability to help you with that either. The same goes for other restrictions. Here's what BigCommerce says about this in their document .
Frequently Asked Questions: When creating a Facebook Shop page
We have received a wide range of questions from readers in the comments section. We want to describe the most popular here so that people quickly refer to the most pressing issues.
"What are the image requirements for product photos on a Facebook store page?"
The best way is to check out Facebook's product listing guidelines - as the requirements change from time to time.
There are also several things to worry about, such as dimensions, image formatting and background. For example, at the time of this article, Facebook recommends having image resolutions of 1024 x 1024 or higher, along with white backgrounds and square images.
"Why can't my customers buy multiple products in one shopping cart?"
It all depends on your own website and payment processor. Facebook does not offer its original shopping cart in some regions, so transactions are redirected to your own shopping cart and payment processor. That said, Facebook is rolling out these features to new countries as we speak.
"What products can I not sell on a Facebook store page?"
Facebook has a list of banned items . Some of the unapproved products include prescription drugs, weapons, animals, alcohol and anything that promotes discrimination.
You can also only sell physical products. That means no downloads or any other type of digital products.
"Why can some not see my Facebook store?"
There are two probable reasons why this happens:
- Your store is not available in countries other than your own.
- The privacy settings for the entire page may be incorrect. An easy mistake to make. Go to settings on your page and make sure that Page Visibility parameter is set to Page published . Like this:

"Do I have to add my products manually?"
It depends on a couple of factors. Here is the most important thing:
- If you have configured your store page via an external e-commerce tool such as Shopify or BigCommerce then everything should be synchronized automatically. This means that Facebook has information on how to link your store and synchronize all products with the Facebook Shop page.
- If you have configured your store page manually, yes, you will need to continue adding your products manually. The same goes for updating all the details about them (price, availability, descriptions, etc.).
Over to you
That's all! You have just learned how to sell on Facebook and hopefully created your own Facebook Shop page now. Unfortunately, things tend to change frequently with Facebook, so if you ever need help performing a particular action on your Shop page, you should find the guidance you need for this official page from the Facebook Help Center.
If you have any questions about building a Facebook Shop page, leave a comment in the section below. If you have successfully created your Facebook store, feel free to leave a link for others to visit and check out the techniques you have used to make your page unique.